Beldum: Różnice pomiędzy wersjami
(Aktualizacja strony) |
|||
| (Nie pokazano 1 wersji utworzonej przez jednego użytkownika) | |||
| Linia 81: | Linia 81: | ||
! width='3%' data-sort-type="number" | '''Celność''' | ! width='3%' data-sort-type="number" | '''Celność''' | ||
! width='38%' class="unsortable" | '''Efekt''' | ! width='38%' class="unsortable" | '''Efekt''' | ||
| + | |- | ||
| + | | '''[[Tackle]]''' | ||
| + | | data-sort-value="1" | <img src='https://pokelife.pl/images/typy/1.png' height='25px' style='margin: 0;'/> | ||
| + | | data-sort-value="1" | <img src='https://pokelife.pl/images/typy/1.jpg' height='25px' style='margin: 0;'/> | ||
| + | | 1 | ||
| + | | 40 | ||
| + | | 100 | ||
| + | | Zadaje obrażenia. | ||
|- | |- | ||
| '''[[Take Down]]''' | | '''[[Take Down]]''' | ||
| − | | data-sort-value="1" | <img src=' | + | | data-sort-value="1" | <img src='https://pokelife.pl/images/typy/1.png' height='25px' style='margin: 0;'/> |
| − | | data-sort-value="1" | <img src=' | + | | data-sort-value="1" | <img src='https://pokelife.pl/images/typy/1.jpg' height='25px' style='margin: 0;'/> |
| 1 | | 1 | ||
| 90 | | 90 | ||
| 85 | | 85 | ||
| − | | | + | | Po trafieniu używający otrzymuje 25% obrażeń zwrotnych. |
| − | + | |} | |
| + | |||
| + | |||
== Dostępne TM == | == Dostępne TM == | ||
| Linia 98: | Linia 108: | ||
! width='3%' data-sort-type="number" | '''Typ''' | ! width='3%' data-sort-type="number" | '''Typ''' | ||
! width='3%' data-sort-type="number" | '''Kategoria''' | ! width='3%' data-sort-type="number" | '''Kategoria''' | ||
| − | ! width='6 | + | ! width='6%' data-sort-type="number" | '''Moc''' |
| − | |||
! width='3%' data-sort-type="number" | '''Celność''' | ! width='3%' data-sort-type="number" | '''Celność''' | ||
! width='38%' class="unsortable" | '''Efekt''' | ! width='38%' class="unsortable" | '''Efekt''' | ||
|- | |- | ||
| − | | '''[[ | + | | '''[[Zen Headbutt|TM 116 Zen Headbutt]]''' |
| − | | data-sort-value=" | + | | data-sort-value="7" | <img src='https://pokelife.pl/images/typy/7.png' height='25px' style='margin: 0;'/> |
| − | | data-sort-value=" | + | | data-sort-value="1" | <img src='https://pokelife.pl/images/typy/1.jpg' height='25px' style='margin: 0;'/> |
| − | | | + | | 80 |
| − | |||
| 90 | | 90 | ||
| − | | | + | | Po trafieniu 20% szansy na oszołomienie przeciwnika. |
|- | |- | ||
| − | | '''[[ | + | | '''[[Iron Defense|TM 161 Iron Defense]]''' |
| − | | data-sort-value=" | + | | data-sort-value="11" | <img src='https://pokelife.pl/images/typy/11.png' height='25px' style='margin: 0;'/> |
| − | + | | data-sort-value="3" | <img src='https://pokelife.pl/images/typy/3.jpg' height='25px' style='margin: 0;'/> | |
| − | |||
| − | |||
| − | |||
| − | |||
| − | |||
| − | |||
| − | |||
| − | |||
| − | |||
| − | |||
| − | |||
| − | |||
| − | |||
| − | |||
| − | |||
| − | |||
| − | |||
| − | |||
| − | |||
| − | |||
| − | |||
| − | |||
| − | |||
| − | | data-sort-value="3" | <img src=' | ||
| − | |||
| − | |||
| − | |||
| − | |||
| − | |||
| − | |||
| − | |||
| − | |||
| − | |||
| - | | - | ||
| 100 | | 100 | ||
| − | | | + | | Po udanym użyciu zwiększa Obronę używającego o 2 poziomy (10%). |
|- | |- | ||
| − | | '''[[ | + | | '''[[Iron Head|TM 162 Iron Head]]''' |
| − | | data-sort-value=" | + | | data-sort-value="11" | <img src='https://pokelife.pl/images/typy/11.png' height='25px' style='margin: 0;'/> |
| − | | data-sort-value=" | + | | data-sort-value="1" | <img src='https://pokelife.pl/images/typy/1.jpg' height='25px' style='margin: 0;'/> |
| − | | | + | | 80 |
| − | |||
| 100 | | 100 | ||
| − | | { | + | | Po trafieniu 30% szansy na oszołomienie przeciwnika. |
| + | |} | ||
| + | |||
| + | |||
| + | |||
| + | == Nauczyciel Ruchów == | ||
| + | |||
| + | {| class="sortable Tabela1" | ||
| + | |- | ||
| + | ! width='12%' class="unsortable" | '''Posunięcie''' | ||
| + | ! width='3%' data-sort-type="number" | '''Typ''' | ||
| + | ! width='3%' data-sort-type="number" | '''Kategoria''' | ||
| + | ! width='6%' data-sort-type="number" | '''Moc''' | ||
| + | ! width='3%' data-sort-type="number" | '''Celność''' | ||
| + | ! width='38%' class="unsortable" | '''Efekt''' | ||
|- | |- | ||
| − | | '''[[ | + | | '''[[Headbutt]]''' |
| − | | data-sort-value="1" | <img src=' | + | | data-sort-value="1" | <img src='https://pokelife.pl/images/typy/1.png' height='25px' style='margin: 0;'/> |
| − | | data-sort-value="1" | <img src=' | + | | data-sort-value="1" | <img src='https://pokelife.pl/images/typy/1.jpg' height='25px' style='margin: 0;'/> |
| − | |||
| 70 | | 70 | ||
| 100 | | 100 | ||
| − | | | + | | Po trafieniu 30% szansy na Oszołomienie przeciwnika. |
| − | |||
| − | |||
| − | |||
| − | |||
| − | |||
| − | |||
| − | |||
| − | |||
| − | |||
| − | |||
| − | |||
| − | |||
| − | |||
| − | |||
| − | |||
| − | |||
|- | |- | ||
| − | | '''[[ | + | | '''[[Iron Defense]]''' |
| − | | data-sort-value=" | + | | data-sort-value="11" | <img src='https://pokelife.pl/images/typy/11.png' height='25px' style='margin: 0;'/> |
| − | | data-sort-value="3" | <img src=' | + | | data-sort-value="3" | <img src='https://pokelife.pl/images/typy/3.jpg' height='25px' style='margin: 0;'/> |
| − | |||
| - | | - | ||
| 100 | | 100 | ||
| − | | | + | | Po udanym użyciu zwiększa Obronę używającego o 2 poziomy (10%). |
| − | |||
| − | |||
| − | |||
| − | |||
| − | |||
| − | |||
| − | |||
| − | |||
| − | |||
| − | |||
| − | |||
| − | |||
| − | |||
| − | |||
| − | |||
| − | |||
|- | |- | ||
| − | + | | '''[[Zen Headbutt]]''' | |
| − | + | | data-sort-value="7" | <img src='https://pokelife.pl/images/typy/7.png' height='25px' style='margin: 0;'/> | |
| − | + | | data-sort-value="1" | <img src='https://pokelife.pl/images/typy/1.jpg' height='25px' style='margin: 0;'/> | |
| − | |||
| − | |||
| − | |||
| − | |||
| − | |||
| − | |||
| − | |||
| − | |||
| − | |||
| − | |||
| − | |||
| − | |||
| − | |||
| − | |||
| − | |||
| − | |||
| − | |||
| − | |||
| − | |||
| − | |||
| − | |||
| − | |||
| − | |||
| − | |||
| − | |||
| − | |||
| − | |||
| − | |||
| − | |||
| − | |||
| − | |||
| − | |||
| − | |||
| − | |||
| − | |||
| − | |||
| − | |||
| − | | '''[[ | ||
| − | | data-sort-value="7" | <img src=' | ||
| − | | data-sort-value="1" | <img src=' | ||
| − | |||
| 80 | | 80 | ||
| 90 | | 90 | ||
| − | | | + | | Po trafieniu 20% szansy na oszołomienie przeciwnika. |
| − | |||
| − | |||
| − | |||
| − | |||
| − | |||
| − | |||
| − | |||
| − | |||
|- | |- | ||
| − | | '''[[ | + | | '''[[Iron Head]]''' |
| − | | data-sort-value=" | + | | data-sort-value="11" | <img src='https://pokelife.pl/images/typy/11.png' height='25px' style='margin: 0;'/> |
| − | | data-sort-value="1" | <img src=' | + | | data-sort-value="1" | <img src='https://pokelife.pl/images/typy/1.jpg' height='25px' style='margin: 0;'/> |
| − | |||
| 80 | | 80 | ||
| 100 | | 100 | ||
| − | | | + | | Po trafieniu 30% szansy na oszołomienie przeciwnika. |
| − | + | |} | |
| − | + | ||
| − | + | ||
| − | |||
| − | |||
| − | |||
| − | |||
| − | |||
| − | |||
| − | |||
| − | |||
| − | |||
| − | |||
| − | |||
| − | |||
| − | | | ||
| − | |||
| − | |||
| − | |||
| − | |||
| − | |||
| − | |||
| − | |||
| − | |||
| − | |||
== Ewolucje == | == Ewolucje == | ||
| Linia 300: | Linia 182: | ||
{| align='center' style='text-align:center;' | {| align='center' style='text-align:center;' | ||
|- | |- | ||
| − | | | + | | https://pokelife.pl/pokemony/sprite/374.gif |
| − | | <br/><big><big>></big></big><br/> 20 lvl | + | | <br/><big><big>></big></big><br/> 20 lvl <br/> |
| − | | | + | | https://pokelife.pl/pokemony/sprite/375.gif |
| − | | <br/><big><big>></big></big><br/> 45 lvl | + | | <br/><big><big>></big></big><br/> 45 lvl <br/> |
| − | + | | https://pokelife.pl/pokemony/sprite/376.gif | |
| − | |||
| − | | | ||
|- | |- | ||
| [[Beldum]] | | [[Beldum]] | ||
| Linia 313: | Linia 193: | ||
| | | | ||
| [[Metagross]] | | [[Metagross]] | ||
| − | |||
| − | |||
|} | |} | ||
| − | + | ||
| + | |||
| + | |||
{| width='100%' frame='box' style='border: solid 2px #555555;' | {| width='100%' frame='box' style='border: solid 2px #555555;' | ||
Aktualna wersja na dzień 04:34, 22 gru 2022
| #373 Salamence | #374 Beldum (Lista Pokemonów) | #375 Metang |
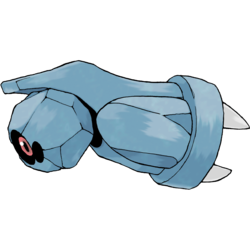
Beldum
|
 Zwykły |
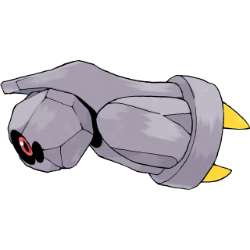 Shiny |
| ||||||||||||||||||||||||||||||||||||
| |||||||||||||||||||||||||||||||||||||||
| |||||||||||||||||||||||||||||||||||||||
 Stalowy
  Psychiczny


Wygląd i zachowanie
Beldum jest pokemonem robotem w całości w kolorze niebieskim. Ma długie ciało z zestawem pazurów wystających z tylnej części. Posiada on jedno, duże, czerwone oko na środku głowy, która ma kulisty kształt i odznacza się od reszty ciała. Chociaż pokemon ten jest mechanicznym stworem, dalej posiada emocje. Do życia nie potrzebuje krwi w żyłach, lecz wystarczą mu siły magnetyczne, którymi się napędza.
Pokemon dzięki magnetyzmowi potrafi lewitować, poruszać się, komunikować oraz kontrolować swoje ataki. Beldumy zazwyczaj gromadzą się w grupkach i porozumiewają poprzez telepatię. Pokemon ten jest rzadkością w naturalnym środowisku, dlatego najczęściej znaleźć go można w obszarach o dość nierównym terenie. Zakotwicza się wtedy pazurami na jakimś urwisku i zasypia. W ten sposób zmniejsza ryzyko zostania zaatakowanym, gdyż jest to miejsce niedostępne dla części potencjalnych wrogów.
Posunięcia
| Posunięcie | Typ | Kategoria | Min lvl | Moc | Celność | Efekt |
|---|---|---|---|---|---|---|
| Tackle | 
|

|
1 | 40 | 100 | Zadaje obrażenia. |
| Take Down |
|
|
1 | 90 | 85 | Po trafieniu używający otrzymuje 25% obrażeń zwrotnych. |
Dostępne TM
| Posunięcie | Typ | Kategoria | Moc | Celność | Efekt |
|---|---|---|---|---|---|
| TM 116 Zen Headbutt | 
|
|
80 | 90 | Po trafieniu 20% szansy na oszołomienie przeciwnika. |
| TM 161 Iron Defense | 
|

|
- | 100 | Po udanym użyciu zwiększa Obronę używającego o 2 poziomy (10%). |
| TM 162 Iron Head |
|
|
80 | 100 | Po trafieniu 30% szansy na oszołomienie przeciwnika. |
Nauczyciel Ruchów
| Posunięcie | Typ | Kategoria | Moc | Celność | Efekt |
|---|---|---|---|---|---|
| Headbutt |
|
|
70 | 100 | Po trafieniu 30% szansy na Oszołomienie przeciwnika. |
| Iron Defense |
|
|
- | 100 | Po udanym użyciu zwiększa Obronę używającego o 2 poziomy (10%). |
| Zen Headbutt |
|
|
80 | 90 | Po trafieniu 20% szansy na oszołomienie przeciwnika. |
| Iron Head |
|
|
80 | 100 | Po trafieniu 30% szansy na oszołomienie przeciwnika. |
Ewolucje

|
> 20 lvl |
|
> 45 lvl |

|
| Beldum | Metang | Metagross |
| Powrót do Listy Pokemonów |