Dragonair: Różnice pomiędzy wersjami
Przejdź do nawigacji
Przejdź do wyszukiwania
| Linia 83: | Linia 83: | ||
|- | |- | ||
| '''[[Wrap]]''' | | '''[[Wrap]]''' | ||
| − | | data-sort-value="1" | <img src=' | + | | data-sort-value="1" | <img src='https://pokelife.pl/images/typy/1.png' height='25px' style='margin: 0;'/> |
| − | | data-sort-value="1" | <img src=' | + | | data-sort-value="1" | <img src='https://pokelife.pl/images/typy/1.jpg' height='25px' style='margin: 0;'/> |
| start | | start | ||
| 15 | | 15 | ||
| Linia 91: | Linia 91: | ||
|- | |- | ||
| '''[[Leer]]''' | | '''[[Leer]]''' | ||
| − | | data-sort-value="1" | <img src=' | + | | data-sort-value="1" | <img src='https://pokelife.pl/images/typy/1.png' height='25px' style='margin: 0;'/> |
| − | | data-sort-value="3" | <img src=' | + | | data-sort-value="3" | <img src='https://pokelife.pl/images/typy/3.jpg' height='25px' style='margin: 0;'/> |
| start | | start | ||
| - | | - | ||
| Linia 99: | Linia 99: | ||
|- | |- | ||
| '''[[Thunder Wave]]''' | | '''[[Thunder Wave]]''' | ||
| − | | data-sort-value="5" | <img src=' | + | | data-sort-value="5" | <img src='https://pokelife.pl/images/typy/5.png' height='25px' style='margin: 0;'/> |
| − | | data-sort-value="3" | <img src=' | + | | data-sort-value="3" | <img src='https://pokelife.pl/images/typy/3.jpg' height='25px' style='margin: 0;'/> |
| start | | start | ||
| - | | - | ||
| − | | | + | | 90 |
| Po trafieniu paraliżuje przeciwnika. | | Po trafieniu paraliżuje przeciwnika. | ||
|- | |- | ||
| '''[[Twister]]''' | | '''[[Twister]]''' | ||
| − | | data-sort-value="17" | <img src=' | + | | data-sort-value="17" | <img src='https://pokelife.pl/images/typy/17.png' height='25px' style='margin: 0;'/> |
| − | | data-sort-value="2" | <img src=' | + | | data-sort-value="2" | <img src='https://pokelife.pl/images/typy/2.jpg' height='25px' style='margin: 0;'/> |
| start | | start | ||
| 40 | | 40 | ||
| Linia 115: | Linia 115: | ||
|- | |- | ||
| '''[[Dragon Rage]]''' | | '''[[Dragon Rage]]''' | ||
| − | | data-sort-value="17" | <img src=' | + | | data-sort-value="17" | <img src='https://pokelife.pl/images/typy/17.png' height='25px' style='margin: 0;'/> |
| − | | data-sort-value="2" | <img src=' | + | | data-sort-value="2" | <img src='https://pokelife.pl/images/typy/2.jpg' height='25px' style='margin: 0;'/> |
| start | | start | ||
| 40 | | 40 | ||
| Linia 122: | Linia 122: | ||
| Ignoruje modyfikatory odporności oraz obron/ataków | | Ignoruje modyfikatory odporności oraz obron/ataków | ||
|- | |- | ||
| − | | '''[[ | + | | '''[[Dragon Tail]]''' |
| − | | data-sort-value=" | + | | data-sort-value="17" | <img src='https://pokelife.pl/images/typy/17.png' height='25px' style='margin: 0;'/> |
| − | | data-sort-value="1" | <img src=' | + | | data-sort-value="1" | <img src='https://pokelife.pl/images/typy/1.jpg' height='25px' style='margin: 0;'/> |
| start | | start | ||
| − | | | + | | 60 |
| − | | | + | | 90 |
| − | | | + | | Atak o priorytecie -6. |
|- | |- | ||
| '''[[Agility]]''' | | '''[[Agility]]''' | ||
| − | | data-sort-value="7" | <img src=' | + | | data-sort-value="7" | <img src='https://pokelife.pl/images/typy/7.png' height='25px' style='margin: 0;'/> |
| − | | data-sort-value="3" | <img src=' | + | | data-sort-value="3" | <img src='https://pokelife.pl/images/typy/3.jpg' height='25px' style='margin: 0;'/> |
| start | | start | ||
| - | | - | ||
| Linia 138: | Linia 138: | ||
| Zwiększa szybkość używającego o 2 poziomy (10%). | | Zwiększa szybkość używającego o 2 poziomy (10%). | ||
|- | |- | ||
| − | | '''[[ | + | | '''[[Slam]]''' |
| − | | data-sort-value=" | + | | data-sort-value="1" | <img src='https://pokelife.pl/images/typy/1.png' height='25px' style='margin: 0;'/> |
| − | | data-sort-value="1" | <img src=' | + | | data-sort-value="1" | <img src='https://pokelife.pl/images/typy/1.jpg' height='25px' style='margin: 0;'/> |
| − | | | + | | start |
| − | | | + | | 80 |
| − | | | + | | 75 |
| − | | | + | | Zadaje obrażenia. |
|- | |- | ||
| '''[[Aqua Tail]]''' | | '''[[Aqua Tail]]''' | ||
| − | | data-sort-value="3" | <img src=' | + | | data-sort-value="3" | <img src='https://pokelife.pl/images/typy/3.png' height='25px' style='margin: 0;'/> |
| − | | data-sort-value="1" | <img src=' | + | | data-sort-value="1" | <img src='https://pokelife.pl/images/typy/1.jpg' height='25px' style='margin: 0;'/> |
| − | | | + | | 33 |
| 90 | | 90 | ||
| 90 | | 90 | ||
| Linia 155: | Linia 155: | ||
|- | |- | ||
| '''[[Dragon Rush]]''' | | '''[[Dragon Rush]]''' | ||
| − | | data-sort-value="17" | <img src=' | + | | data-sort-value="17" | <img src='https://pokelife.pl/images/typy/17.png' height='25px' style='margin: 0;'/> |
| − | | data-sort-value="1" | <img src=' | + | | data-sort-value="1" | <img src='https://pokelife.pl/images/typy/1.jpg' height='25px' style='margin: 0;'/> |
| − | | | + | | 39 |
| 100 | | 100 | ||
| 75 | | 75 | ||
| Linia 163: | Linia 163: | ||
|- | |- | ||
| '''[[Safeguard]]''' | | '''[[Safeguard]]''' | ||
| − | | data-sort-value="1" | <img src=' | + | | data-sort-value="1" | <img src='https://pokelife.pl/images/typy/1.png' height='25px' style='margin: 0;'/> |
| − | | data-sort-value="3" | <img src=' | + | | data-sort-value="3" | <img src='https://pokelife.pl/images/typy/3.jpg' height='25px' style='margin: 0;'/> |
| + | | 46 | ||
| + | | - | ||
| + | | 100 | ||
| + | | Po użyciu chroni używającego przed atakami zmieniającymi stan: paraliż, dezorientacja itd. Działa 3 rundy. | ||
| + | |- | ||
| + | | '''[[Rain Dance]]''' | ||
| + | | data-sort-value="3" | <img src='https://pokelife.pl/images/typy/3.png' height='25px' style='margin: 0;'/> | ||
| + | | data-sort-value="3" | <img src='https://pokelife.pl/images/typy/3.jpg' height='25px' style='margin: 0;'/> | ||
| 53 | | 53 | ||
| - | | - | ||
| 100 | | 100 | ||
| − | | | + | | Przywołuje pogodę - Deszcz. |
|- | |- | ||
| '''[[Dragon Dance]]''' | | '''[[Dragon Dance]]''' | ||
| − | | data-sort-value="17" | <img src=' | + | | data-sort-value="17" | <img src='https://pokelife.pl/images/typy/17.png' height='25px' style='margin: 0;'/> |
| − | | data-sort-value="3" | <img src=' | + | | data-sort-value="3" | <img src='https://pokelife.pl/images/typy/3.jpg' height='25px' style='margin: 0;'/> |
| − | | | + | | 60 |
| - | | - | ||
| 100 | | 100 | ||
| Linia 179: | Linia 187: | ||
|- | |- | ||
| '''[[Outrage]]''' | | '''[[Outrage]]''' | ||
| − | | data-sort-value="17" | <img src=' | + | | data-sort-value="17" | <img src='https://pokelife.pl/images/typy/17.png' height='25px' style='margin: 0;'/> |
| − | | data-sort-value="1" | <img src=' | + | | data-sort-value="1" | <img src='https://pokelife.pl/images/typy/1.jpg' height='25px' style='margin: 0;'/> |
| 67 | | 67 | ||
| 120 | | 120 | ||
| 100 | | 100 | ||
| − | | Pokemon atakuje 2-3 | + | | Pokemon atakuje przez 2-3 rundy po czym używający popada w Dezorientacje (lub gdy spudłuje). Każda runda ma osobną szansę na trafienie. Działanie ataku jest od razu przerywane jeśli Pokemon nie trafi, wykonanie ruchu będzie niemożliwe (Paraliż, Dezorientacja, Zamrożenie) lub zaatakuje Pokemona używającego Fly, Dig bądź odpornego na typ. |
|- | |- | ||
| '''[[Hyper Beam]]''' | | '''[[Hyper Beam]]''' | ||
| − | | data-sort-value="1" | <img src=' | + | | data-sort-value="1" | <img src='https://pokelife.pl/images/typy/1.png' height='25px' style='margin: 0;'/> |
| − | | data-sort-value="2" | <img src=' | + | | data-sort-value="2" | <img src='https://pokelife.pl/images/typy/2.jpg' height='25px' style='margin: 0;'/> |
| − | | | + | | 74 |
| 150 | | 150 | ||
| 90 | | 90 | ||
| W drugiej rundzie odpoczywa regenerując siły. | | W drugiej rundzie odpoczywa regenerując siły. | ||
| − | |} | + | |} |
| + | |||
| + | |||
== Dostępne TM == | == Dostępne TM == | ||
| Linia 202: | Linia 212: | ||
! width='3%' data-sort-type="number" | '''Typ''' | ! width='3%' data-sort-type="number" | '''Typ''' | ||
! width='3%' data-sort-type="number" | '''Kategoria''' | ! width='3%' data-sort-type="number" | '''Kategoria''' | ||
| − | ! width='6 | + | ! width='6%' data-sort-type="number" | '''Moc''' |
| − | |||
! width='3%' data-sort-type="number" | '''Celność''' | ! width='3%' data-sort-type="number" | '''Celność''' | ||
! width='38%' class="unsortable" | '''Efekt''' | ! width='38%' class="unsortable" | '''Efekt''' | ||
|- | |- | ||
| '''[[Toxic|TM 6 Toxic]]''' | | '''[[Toxic|TM 6 Toxic]]''' | ||
| − | | data-sort-value="8" | <img src=' | + | | data-sort-value="8" | <img src='https://pokelife.pl/images/typy/8.png' height='25px' style='margin: 0;'/> |
| − | | data-sort-value="3" | <img src=' | + | | data-sort-value="3" | <img src='https://pokelife.pl/images/typy/3.jpg' height='25px' style='margin: 0;'/> |
| − | |||
| - | | - | ||
| 90 | | 90 | ||
| Atak sam w sobie nie zadaje obrażeń, lecz ma dwa stopnie - zatrucia oraz zatrucia śmiertelnego, które zadaje podwójne obrażenia w stosunku do tego pierwszego. Zawsze trafia, gdy zostanie użyty przez trującego Pokemona. | | Atak sam w sobie nie zadaje obrażeń, lecz ma dwa stopnie - zatrucia oraz zatrucia śmiertelnego, które zadaje podwójne obrażenia w stosunku do tego pierwszego. Zawsze trafia, gdy zostanie użyty przez trującego Pokemona. | ||
| − | |||
| − | |||
| − | |||
| − | |||
| − | |||
| − | |||
| − | |||
| − | |||
|- | |- | ||
| '''[[Body Slam|TM 8 Body Slam]]''' | | '''[[Body Slam|TM 8 Body Slam]]''' | ||
| − | | data-sort-value="1" | <img src=' | + | | data-sort-value="1" | <img src='https://pokelife.pl/images/typy/1.png' height='25px' style='margin: 0;'/> |
| − | | data-sort-value="1" | <img src=' | + | | data-sort-value="1" | <img src='https://pokelife.pl/images/typy/1.jpg' height='25px' style='margin: 0;'/> |
| − | |||
| 85 | | 85 | ||
| 100 | | 100 | ||
| Jeśli wcześniej (nieważne jak dawno temu) przeciwnik użył Minimize, to Body Slam zawsze trafi i podwaja moc. Posiada 30% szans na paraliż przeciwnika. | | Jeśli wcześniej (nieważne jak dawno temu) przeciwnik użył Minimize, to Body Slam zawsze trafi i podwaja moc. Posiada 30% szans na paraliż przeciwnika. | ||
| − | |||
| − | |||
| − | |||
| − | |||
| − | |||
| − | |||
| − | |||
| − | |||
| − | |||
| − | |||
| − | |||
| − | |||
| − | |||
| − | |||
| − | |||
| − | |||
| − | |||
| − | |||
| − | |||
| − | |||
| − | |||
| − | |||
| − | |||
| − | |||
| − | |||
| − | |||
| − | |||
| − | |||
| − | |||
| − | |||
| − | |||
| − | |||
|- | |- | ||
| '''[[Ice Beam|TM 13 Ice Beam]]''' | | '''[[Ice Beam|TM 13 Ice Beam]]''' | ||
| − | | data-sort-value="14" | <img src=' | + | | data-sort-value="14" | <img src='https://pokelife.pl/images/typy/14.png' height='25px' style='margin: 0;'/> |
| − | | data-sort-value="2" | <img src=' | + | | data-sort-value="2" | <img src='https://pokelife.pl/images/typy/2.jpg' height='25px' style='margin: 0;'/> |
| − | |||
| 90 | | 90 | ||
| 100 | | 100 | ||
| Linia 272: | Linia 238: | ||
|- | |- | ||
| '''[[Blizzard|TM 14 Blizzard]]''' | | '''[[Blizzard|TM 14 Blizzard]]''' | ||
| − | | data-sort-value="14" | <img src=' | + | | data-sort-value="14" | <img src='https://pokelife.pl/images/typy/14.png' height='25px' style='margin: 0;'/> |
| − | | data-sort-value="2" | <img src=' | + | | data-sort-value="2" | <img src='https://pokelife.pl/images/typy/2.jpg' height='25px' style='margin: 0;'/> |
| − | |||
| 110 | | 110 | ||
| 70 | | 70 | ||
| Linia 280: | Linia 245: | ||
|- | |- | ||
| '''[[Hyper Beam|TM 15 Hyper Beam]]''' | | '''[[Hyper Beam|TM 15 Hyper Beam]]''' | ||
| − | | data-sort-value="1" | <img src=' | + | | data-sort-value="1" | <img src='https://pokelife.pl/images/typy/1.png' height='25px' style='margin: 0;'/> |
| − | | data-sort-value="2" | <img src=' | + | | data-sort-value="2" | <img src='https://pokelife.pl/images/typy/2.jpg' height='25px' style='margin: 0;'/> |
| − | |||
| 150 | | 150 | ||
| 90 | | 90 | ||
| W drugiej rundzie odpoczywa regenerując siły. | | W drugiej rundzie odpoczywa regenerując siły. | ||
| − | |||
| − | |||
| − | |||
| − | |||
| − | |||
| − | |||
| − | |||
| − | |||
| − | |||
| − | |||
| − | |||
| − | |||
| − | |||
| − | |||
| − | |||
| − | |||
|- | |- | ||
| '''[[Thunderbolt|TM 24 Thunderbolt]]''' | | '''[[Thunderbolt|TM 24 Thunderbolt]]''' | ||
| − | | data-sort-value="5" | <img src=' | + | | data-sort-value="5" | <img src='https://pokelife.pl/images/typy/5.png' height='25px' style='margin: 0;'/> |
| − | | data-sort-value="2" | <img src=' | + | | data-sort-value="2" | <img src='https://pokelife.pl/images/typy/2.jpg' height='25px' style='margin: 0;'/> |
| − | |||
| 90 | | 90 | ||
| 100 | | 100 | ||
| Linia 312: | Linia 259: | ||
|- | |- | ||
| '''[[Thunder|TM 25 Thunder]]''' | | '''[[Thunder|TM 25 Thunder]]''' | ||
| − | | data-sort-value="5" | <img src=' | + | | data-sort-value="5" | <img src='https://pokelife.pl/images/typy/5.png' height='25px' style='margin: 0;'/> |
| − | | data-sort-value="2" | <img src=' | + | | data-sort-value="2" | <img src='https://pokelife.pl/images/typy/2.jpg' height='25px' style='margin: 0;'/> |
| − | |||
| 110 | | 110 | ||
| 70 | | 70 | ||
| Po trafieniu 30% szansy na sparaliżowanie przeciwnika. Trafia w trakcie Fly, Bounce i Sky Drop. W trakcje Ostrego Słońca celność spada o 50%, a w trakcie Deszczu ma pewne trafienie. | | Po trafieniu 30% szansy na sparaliżowanie przeciwnika. Trafia w trakcie Fly, Bounce i Sky Drop. W trakcje Ostrego Słońca celność spada o 50%, a w trakcie Deszczu ma pewne trafienie. | ||
| − | |||
| − | |||
| − | |||
| − | |||
| − | |||
| − | |||
| − | |||
| − | |||
|- | |- | ||
| '''[[Double Team|TM 32 Double Team]]''' | | '''[[Double Team|TM 32 Double Team]]''' | ||
| − | | data-sort-value="1" | <img src=' | + | | data-sort-value="1" | <img src='https://pokelife.pl/images/typy/1.png' height='25px' style='margin: 0;'/> |
| − | | data-sort-value="3" | <img src=' | + | | data-sort-value="3" | <img src='https://pokelife.pl/images/typy/3.jpg' height='25px' style='margin: 0;'/> |
| − | |||
| - | | - | ||
| 100 | | 100 | ||
| Zwiększa Unik używającego o 1 poziom (5%). | | Zwiększa Unik używającego o 1 poziom (5%). | ||
| − | |||
| − | |||
| − | |||
| − | |||
| − | |||
| − | |||
| − | |||
| − | |||
| − | |||
| − | |||
| − | |||
| − | |||
| − | |||
| − | |||
| − | |||
| − | |||
|- | |- | ||
| '''[[Fire Blast|TM 38 Fire Blast]]''' | | '''[[Fire Blast|TM 38 Fire Blast]]''' | ||
| − | | data-sort-value="2" | <img src=' | + | | data-sort-value="2" | <img src='https://pokelife.pl/images/typy/2.png' height='25px' style='margin: 0;'/> |
| − | | data-sort-value="2" | <img src=' | + | | data-sort-value="2" | <img src='https://pokelife.pl/images/typy/2.jpg' height='25px' style='margin: 0;'/> |
| − | |||
| 110 | | 110 | ||
| 85 | | 85 | ||
| Linia 360: | Linia 280: | ||
|- | |- | ||
| '''[[Swift|TM 39 Swift]]''' | | '''[[Swift|TM 39 Swift]]''' | ||
| − | | data-sort-value="1" | <img src=' | + | | data-sort-value="1" | <img src='https://pokelife.pl/images/typy/1.png' height='25px' style='margin: 0;'/> |
| − | | data-sort-value="2" | <img src=' | + | | data-sort-value="2" | <img src='https://pokelife.pl/images/typy/2.jpg' height='25px' style='margin: 0;'/> |
| − | |||
| 60 | | 60 | ||
| 1000 | | 1000 | ||
| Zawsze trafia. | | Zawsze trafia. | ||
| − | |||
| − | |||
| − | |||
| − | |||
| − | |||
| − | |||
| − | |||
| − | |||
|- | |- | ||
| '''[[Rest|TM 44 Rest]]''' | | '''[[Rest|TM 44 Rest]]''' | ||
| − | | data-sort-value="7" | <img src=' | + | | data-sort-value="7" | <img src='https://pokelife.pl/images/typy/7.png' height='25px' style='margin: 0;'/> |
| − | | data-sort-value="3" | <img src=' | + | | data-sort-value="3" | <img src='https://pokelife.pl/images/typy/3.jpg' height='25px' style='margin: 0;'/> |
| − | |||
| - | | - | ||
| 100 | | 100 | ||
| − | | | + | | W pierwszej rundzie leczy 25% aktualnego zdrowia pokemona oraz, jeśli pokemon dalej śpi pod koniec kolejnej rundy, leczy o kolejne 20% zdrowia z rundy, w której Rest został użyty. Dodatkowo ma 100% szans na usunięcie statusów (poparzenie, trucizna, paraliż). Po użyciu Rest, Pokemon śpi rundę, po czym w drugiej budzi się i używa następnego ataku. |
|- | |- | ||
| '''[[Thunder Wave|TM 45 Thunder Wave]]''' | | '''[[Thunder Wave|TM 45 Thunder Wave]]''' | ||
| − | | data-sort-value="5" | <img src=' | + | | data-sort-value="5" | <img src='https://pokelife.pl/images/typy/5.png' height='25px' style='margin: 0;'/> |
| − | | data-sort-value="3" | <img src=' | + | | data-sort-value="3" | <img src='https://pokelife.pl/images/typy/3.jpg' height='25px' style='margin: 0;'/> |
| − | |||
| - | | - | ||
| − | | | + | | 90 |
| Po trafieniu paraliżuje przeciwnika. | | Po trafieniu paraliżuje przeciwnika. | ||
|- | |- | ||
| '''[[Headbutt|TM 51 Headbutt]]''' | | '''[[Headbutt|TM 51 Headbutt]]''' | ||
| − | | data-sort-value="1" | <img src=' | + | | data-sort-value="1" | <img src='https://pokelife.pl/images/typy/1.png' height='25px' style='margin: 0;'/> |
| − | | data-sort-value="1" | <img src=' | + | | data-sort-value="1" | <img src='https://pokelife.pl/images/typy/1.jpg' height='25px' style='margin: 0;'/> |
| − | |||
| 70 | | 70 | ||
| 100 | | 100 | ||
| Linia 400: | Linia 308: | ||
|- | |- | ||
| '''[[Curse|TM 52 Curse]]''' | | '''[[Curse|TM 52 Curse]]''' | ||
| − | | data-sort-value="9" | <img src=' | + | | data-sort-value="9" | <img src='https://pokelife.pl/images/typy/9.png' height='25px' style='margin: 0;'/> |
| − | | data-sort-value="3" | <img src=' | + | | data-sort-value="3" | <img src='https://pokelife.pl/images/typy/3.jpg' height='25px' style='margin: 0;'/> |
| − | |||
| - | | - | ||
| 100 | | 100 | ||
| − | | Po użyciu działanie tego ataku jest zależne od tego, jakiego typu Pokemon go używa. Jeśli a) duch - Pokemon odbiera sobie 25% obecnego HP. Przeciwnik zostaje przeklęty i co | + | | Po użyciu działanie tego ataku jest zależne od tego, jakiego typu Pokemon go używa. Jeśli a) duch - Pokemon odbiera sobie 25% obecnego HP. Przeciwnik zostaje przeklęty i co rundę, przez 3 rundy, traci ilość życia równą 40% tego ile odjął sobie atakujący Pok. Czyli w sumie 120%. b) inny typ niż duch - obniżamy swoją szybkość, ale podwyższamy Atak i Obronę o 1 poziom (5%). |
|- | |- | ||
| '''[[Zap Cannon|TM 54 Zap Cannon]]''' | | '''[[Zap Cannon|TM 54 Zap Cannon]]''' | ||
| − | | data-sort-value="5" | <img src=' | + | | data-sort-value="5" | <img src='https://pokelife.pl/images/typy/5.png' height='25px' style='margin: 0;'/> |
| − | | data-sort-value="2" | <img src=' | + | | data-sort-value="2" | <img src='https://pokelife.pl/images/typy/2.jpg' height='25px' style='margin: 0;'/> |
| − | |||
| 120 | | 120 | ||
| 50 | | 50 | ||
| − | | Po trafieniu | + | | Po trafieniu Paraliżuje przeciwnika. Jeśli przeciwnik ma wyższą Szybkość, szansa na Paraliż zostanie zmniejszona do 30%. |
|- | |- | ||
| '''[[Sunny Day|TM 57 Sunny Day]]''' | | '''[[Sunny Day|TM 57 Sunny Day]]''' | ||
| − | | data-sort-value="2" | <img src=' | + | | data-sort-value="2" | <img src='https://pokelife.pl/images/typy/2.png' height='25px' style='margin: 0;'/> |
| − | | data-sort-value="3" | <img src=' | + | | data-sort-value="3" | <img src='https://pokelife.pl/images/typy/3.jpg' height='25px' style='margin: 0;'/> |
| − | |||
| - | | - | ||
| 100 | | 100 | ||
| Linia 424: | Linia 329: | ||
|- | |- | ||
| '''[[Snore|TM 59 Snore]]''' | | '''[[Snore|TM 59 Snore]]''' | ||
| − | | data-sort-value="1" | <img src=' | + | | data-sort-value="1" | <img src='https://pokelife.pl/images/typy/1.png' height='25px' style='margin: 0;'/> |
| − | | data-sort-value="2" | <img src=' | + | | data-sort-value="2" | <img src='https://pokelife.pl/images/typy/2.jpg' height='25px' style='margin: 0;'/> |
| − | |||
| 50 | | 50 | ||
| 100 | | 100 | ||
| Linia 432: | Linia 336: | ||
|- | |- | ||
| '''[[Icy Wind|TM 60 Icy Wind]]''' | | '''[[Icy Wind|TM 60 Icy Wind]]''' | ||
| − | | data-sort-value="14" | <img src=' | + | | data-sort-value="14" | <img src='https://pokelife.pl/images/typy/14.png' height='25px' style='margin: 0;'/> |
| − | | data-sort-value="2" | <img src=' | + | | data-sort-value="2" | <img src='https://pokelife.pl/images/typy/2.jpg' height='25px' style='margin: 0;'/> |
| − | |||
| 55 | | 55 | ||
| 95 | | 95 | ||
| Linia 440: | Linia 343: | ||
|- | |- | ||
| '''[[Protect|TM 61 Protect]]''' | | '''[[Protect|TM 61 Protect]]''' | ||
| − | | data-sort-value="1" | <img src=' | + | | data-sort-value="1" | <img src='https://pokelife.pl/images/typy/1.png' height='25px' style='margin: 0;'/> |
| − | | data-sort-value="3" | <img src=' | + | | data-sort-value="3" | <img src='https://pokelife.pl/images/typy/3.jpg' height='25px' style='margin: 0;'/> |
| − | |||
| - | | - | ||
| 100 | | 100 | ||
| − | | | + | | Po użyciu zablokuje następny, niestatusowy ruch przeciwnika. Atak o priorytecie 4. Szansa na zadziałanie efektu ruchu jest zmniejszana o -5% za każde skuteczne zablokowanie ruchu. Inne ruchy ohronne (Protect, Detect, Endure, Quick Guard, Spiky Shield, King's Shield, Baneful Bunker) dzielą tą samą szansę zadziałania efektu. Dodatkowo jeśli Pokemon posiada więcej niż jeden ruch ochronny, minimalna szansa na zadziałanie (równa 50%) jest dzielona przez 2 za każdy ruch ochronny ponad pierwszy. |
|- | |- | ||
| '''[[Rain Dance|TM 62 Rain Dance]]''' | | '''[[Rain Dance|TM 62 Rain Dance]]''' | ||
| − | | data-sort-value="3" | <img src=' | + | | data-sort-value="3" | <img src='https://pokelife.pl/images/typy/3.png' height='25px' style='margin: 0;'/> |
| − | | data-sort-value="3" | <img src=' | + | | data-sort-value="3" | <img src='https://pokelife.pl/images/typy/3.jpg' height='25px' style='margin: 0;'/> |
| − | |||
| - | | - | ||
| 100 | | 100 | ||
| Linia 456: | Linia 357: | ||
|- | |- | ||
| '''[[Endure|TM 64 Endure]]''' | | '''[[Endure|TM 64 Endure]]''' | ||
| − | | data-sort-value="1" | <img src=' | + | | data-sort-value="1" | <img src='https://pokelife.pl/images/typy/1.png' height='25px' style='margin: 0;'/> |
| − | | data-sort-value="3" | <img src=' | + | | data-sort-value="3" | <img src='https://pokelife.pl/images/typy/3.jpg' height='25px' style='margin: 0;'/> |
| − | |||
| - | | - | ||
| 100 | | 100 | ||
| − | | Przez 2 rundy nie można powalić Pokemona bezpośrednim atakiem (efekt znika po zablokowaniu pierwszego ruchu). | + | | Przez 2 rundy nie można powalić Pokemona bezpośrednim atakiem (efekt znika po zablokowaniu pierwszego ruchu). Szansa na zadziałanie efektu ruchu jest zmniejszana o -5% za każde skuteczne przetrwanie ataku. Inne ruchy ohronne (Protect, Detect, Endure, Quick Guard, Spiky Shield, King's Shield, Baneful Bunker) dzielą tą samą szansę zadziałania efektu. Dodatkowo jeśli Pokemon posiada więcej niż jeden ruch ochronny, minimalna szansa na zadziałanie (równa 50%) jest dzielona przez 2 za każdy ruch ochronny ponad pierwszy.. |
|- | |- | ||
| '''[[Frustration|TM 65 Frustration]]''' | | '''[[Frustration|TM 65 Frustration]]''' | ||
| − | | data-sort-value="1" | <img src=' | + | | data-sort-value="1" | <img src='https://pokelife.pl/images/typy/1.png' height='25px' style='margin: 0;'/> |
| − | | data-sort-value="1" | <img src=' | + | | data-sort-value="1" | <img src='https://pokelife.pl/images/typy/1.jpg' height='25px' style='margin: 0;'/> |
| − | |||
| 60 | | 60 | ||
| 100 | | 100 | ||
| Linia 472: | Linia 371: | ||
|- | |- | ||
| '''[[Iron Tail|TM 66 Iron Tail]]''' | | '''[[Iron Tail|TM 66 Iron Tail]]''' | ||
| − | | data-sort-value="11" | <img src=' | + | | data-sort-value="11" | <img src='https://pokelife.pl/images/typy/11.png' height='25px' style='margin: 0;'/> |
| − | | data-sort-value="1" | <img src=' | + | | data-sort-value="1" | <img src='https://pokelife.pl/images/typy/1.jpg' height='25px' style='margin: 0;'/> |
| − | |||
| 100 | | 100 | ||
| 75 | | 75 | ||
| Linia 480: | Linia 378: | ||
|- | |- | ||
| '''[[Dragon Breath|TM 67 Dragon Breath]]''' | | '''[[Dragon Breath|TM 67 Dragon Breath]]''' | ||
| − | | data-sort-value="17" | <img src=' | + | | data-sort-value="17" | <img src='https://pokelife.pl/images/typy/17.png' height='25px' style='margin: 0;'/> |
| − | | data-sort-value="2" | <img src=' | + | | data-sort-value="2" | <img src='https://pokelife.pl/images/typy/2.jpg' height='25px' style='margin: 0;'/> |
| − | |||
| 60 | | 60 | ||
| 100 | | 100 | ||
| Linia 488: | Linia 385: | ||
|- | |- | ||
| '''[[Return|TM 68 Return]]''' | | '''[[Return|TM 68 Return]]''' | ||
| − | | data-sort-value="1" | <img src=' | + | | data-sort-value="1" | <img src='https://pokelife.pl/images/typy/1.png' height='25px' style='margin: 0;'/> |
| − | | data-sort-value="1" | <img src=' | + | | data-sort-value="1" | <img src='https://pokelife.pl/images/typy/1.jpg' height='25px' style='margin: 0;'/> |
| − | |||
| 60 | | 60 | ||
| 100 | | 100 | ||
| Linia 496: | Linia 392: | ||
|- | |- | ||
| '''[[Detect|TM 75 Detect]]''' | | '''[[Detect|TM 75 Detect]]''' | ||
| − | | data-sort-value="10" | <img src=' | + | | data-sort-value="10" | <img src='https://pokelife.pl/images/typy/10.png' height='25px' style='margin: 0;'/> |
| − | | data-sort-value="3" | <img src=' | + | | data-sort-value="3" | <img src='https://pokelife.pl/images/typy/3.jpg' height='25px' style='margin: 0;'/> |
| − | |||
| - | | - | ||
| 100 | | 100 | ||
| − | | | + | | Po użyciu zablokuje następny, niestatusowy ruch przeciwnika. Atak o priorytecie 4. Szansa na zadziałanie efektu ruchu jest zmniejszana o -5% za każde skuteczne zablokowanie ruchu. Inne ruchy ohronne (Protect, Detect, Endure, Quick Guard, Spiky Shield, King's Shield, Baneful Bunker) dzielą tą samą szansę zadziałania efektu. Dodatkowo jeśli Pokemon posiada więcej niż jeden ruch ochronny, minimalna szansa na zadziałanie (równa 50%) jest dzielona przez 2 za każdy ruch ochronny ponad pierwszy. |
|- | |- | ||
| '''[[Attract|TM 76 Attract]]''' | | '''[[Attract|TM 76 Attract]]''' | ||
| − | | data-sort-value="1" | <img src=' | + | | data-sort-value="1" | <img src='https://pokelife.pl/images/typy/1.png' height='25px' style='margin: 0;'/> |
| − | | data-sort-value="3" | <img src=' | + | | data-sort-value="3" | <img src='https://pokelife.pl/images/typy/3.jpg' height='25px' style='margin: 0;'/> |
| − | |||
| - | | - | ||
| 100 | | 100 | ||
| − | | Po trafieniu wprowadza przeciwnika w stan zakochania. Zakochanie trwa 2 | + | | Po trafieniu wprowadza przeciwnika w stan zakochania. Zakochanie trwa 2 rundy, podczas których Pokemon ma 50% na zaatakowanie. Działa tylko jeśli pokemony są przeciwnych płci. |
|- | |- | ||
| '''[[Swagger|TM 82 Swagger]]''' | | '''[[Swagger|TM 82 Swagger]]''' | ||
| − | | data-sort-value="1" | <img src=' | + | | data-sort-value="1" | <img src='https://pokelife.pl/images/typy/1.png' height='25px' style='margin: 0;'/> |
| − | | data-sort-value="3" | <img src=' | + | | data-sort-value="3" | <img src='https://pokelife.pl/images/typy/3.jpg' height='25px' style='margin: 0;'/> |
| − | |||
| - | | - | ||
| − | | | + | | 85 |
| − | | Po udanym użyciu zwiększa Atak przeciwnika o 2 poziomy (10%) ale także go | + | | Po udanym użyciu zwiększa Atak przeciwnika o 2 poziomy (10%) ale także go Dezorientuje. |
|- | |- | ||
| '''[[Sleep Talk|TM 83 Sleep Talk]]''' | | '''[[Sleep Talk|TM 83 Sleep Talk]]''' | ||
| − | | data-sort-value="1" | <img src=' | + | | data-sort-value="1" | <img src='https://pokelife.pl/images/typy/1.png' height='25px' style='margin: 0;'/> |
| − | | data-sort-value="3" | <img src=' | + | | data-sort-value="3" | <img src='https://pokelife.pl/images/typy/3.jpg' height='25px' style='margin: 0;'/> |
| − | |||
| - | | - | ||
| 100 | | 100 | ||
| Linia 528: | Linia 420: | ||
|- | |- | ||
| '''[[Flamethrower|TM 84 Flamethrower]]''' | | '''[[Flamethrower|TM 84 Flamethrower]]''' | ||
| − | | data-sort-value="2" | <img src=' | + | | data-sort-value="2" | <img src='https://pokelife.pl/images/typy/2.png' height='25px' style='margin: 0;'/> |
| − | | data-sort-value="2" | <img src=' | + | | data-sort-value="2" | <img src='https://pokelife.pl/images/typy/2.jpg' height='25px' style='margin: 0;'/> |
| − | |||
| 90 | | 90 | ||
| 100 | | 100 | ||
| Linia 536: | Linia 427: | ||
|- | |- | ||
| '''[[Outrage|TM 87 Outrage]]''' | | '''[[Outrage|TM 87 Outrage]]''' | ||
| − | | data-sort-value="17" | <img src=' | + | | data-sort-value="17" | <img src='https://pokelife.pl/images/typy/17.png' height='25px' style='margin: 0;'/> |
| − | | data-sort-value="1" | <img src=' | + | | data-sort-value="1" | <img src='https://pokelife.pl/images/typy/1.jpg' height='25px' style='margin: 0;'/> |
| − | |||
| 120 | | 120 | ||
| 100 | | 100 | ||
| − | | Pokemon atakuje 2-3 | + | | Pokemon atakuje przez 2-3 rundy po czym używający popada w Dezorientacje (lub gdy spudłuje). Każda runda ma osobną szansę na trafienie. Działanie ataku jest od razu przerywane jeśli Pokemon nie trafi, wykonanie ruchu będzie niemożliwe (Paraliż, Dezorientacja, Zamrożenie) lub zaatakuje Pokemona używającego Fly, Dig bądź odpornego na typ. |
| − | |||
| − | |||
| − | |||
| − | |||
| − | |||
| − | |||
| − | |||
| − | |||
|- | |- | ||
| '''[[Water Pulse|TM 95 Water Pulse]]''' | | '''[[Water Pulse|TM 95 Water Pulse]]''' | ||
| − | | data-sort-value="3" | <img src=' | + | | data-sort-value="3" | <img src='https://pokelife.pl/images/typy/3.png' height='25px' style='margin: 0;'/> |
| − | | data-sort-value="2" | <img src=' | + | | data-sort-value="2" | <img src='https://pokelife.pl/images/typy/2.jpg' height='25px' style='margin: 0;'/> |
| − | |||
| 60 | | 60 | ||
| 100 | | 100 | ||
| − | | Po trafieniu 20% szansy na | + | | Po trafieniu 20% szansy na Zdezorientowanie przeciwnika. |
|- | |- | ||
| '''[[Hail|TM 100 Hail]]''' | | '''[[Hail|TM 100 Hail]]''' | ||
| − | | data-sort-value="14" | <img src=' | + | | data-sort-value="14" | <img src='https://pokelife.pl/images/typy/14.png' height='25px' style='margin: 0;'/> |
| − | | data-sort-value="3" | <img src=' | + | | data-sort-value="3" | <img src='https://pokelife.pl/images/typy/3.jpg' height='25px' style='margin: 0;'/> |
| − | |||
| - | | - | ||
| 100 | | 100 | ||
| Linia 568: | Linia 448: | ||
|- | |- | ||
| '''[[Light Screen|TM 101 Light Screen]]''' | | '''[[Light Screen|TM 101 Light Screen]]''' | ||
| − | | data-sort-value="7" | <img src=' | + | | data-sort-value="7" | <img src='https://pokelife.pl/images/typy/7.png' height='25px' style='margin: 0;'/> |
| − | | data-sort-value="3" | <img src=' | + | | data-sort-value="3" | <img src='https://pokelife.pl/images/typy/3.jpg' height='25px' style='margin: 0;'/> |
| − | |||
| - | | - | ||
| 100 | | 100 | ||
| − | | Obniża o 40% obrażenia od specjalnych ataków na 3 | + | | Obniża o 40% obrażenia od specjalnych ataków na 3 rundy (z wyjątkiem obrażeń niezależnych od mocy). |
|- | |- | ||
| '''[[Safeguard|TM 102 Safeguard]]''' | | '''[[Safeguard|TM 102 Safeguard]]''' | ||
| − | | data-sort-value="1" | <img src=' | + | | data-sort-value="1" | <img src='https://pokelife.pl/images/typy/1.png' height='25px' style='margin: 0;'/> |
| − | | data-sort-value="3" | <img src=' | + | | data-sort-value="3" | <img src='https://pokelife.pl/images/typy/3.jpg' height='25px' style='margin: 0;'/> |
| − | |||
| - | | - | ||
| 100 | | 100 | ||
| − | | Po użyciu chroni używającego przed atakami zmieniającymi stan: paraliż, | + | | Po użyciu chroni używającego przed atakami zmieniającymi stan: paraliż, dezorientacja itd. Działa 3 rundy. |
|- | |- | ||
| '''[[Shock Wave|TM 104 Shock Wave]]''' | | '''[[Shock Wave|TM 104 Shock Wave]]''' | ||
| − | | data-sort-value="5" | <img src=' | + | | data-sort-value="5" | <img src='https://pokelife.pl/images/typy/5.png' height='25px' style='margin: 0;'/> |
| − | | data-sort-value="2" | <img src=' | + | | data-sort-value="2" | <img src='https://pokelife.pl/images/typy/2.jpg' height='25px' style='margin: 0;'/> |
| − | |||
| 60 | | 60 | ||
| 1000 | | 1000 | ||
| Linia 592: | Linia 469: | ||
|- | |- | ||
| '''[[Facade|TM 108 Facade]]''' | | '''[[Facade|TM 108 Facade]]''' | ||
| − | | data-sort-value="1" | <img src=' | + | | data-sort-value="1" | <img src='https://pokelife.pl/images/typy/1.png' height='25px' style='margin: 0;'/> |
| − | | data-sort-value="1" | <img src=' | + | | data-sort-value="1" | <img src='https://pokelife.pl/images/typy/1.jpg' height='25px' style='margin: 0;'/> |
| − | |||
| 70 | | 70 | ||
| 100 | | 100 | ||
| Linia 600: | Linia 476: | ||
|- | |- | ||
| '''[[Secret Power|TM 109 Secret Power]]''' | | '''[[Secret Power|TM 109 Secret Power]]''' | ||
| − | | data-sort-value="1" | <img src=' | + | | data-sort-value="1" | <img src='https://pokelife.pl/images/typy/1.png' height='25px' style='margin: 0;'/> |
| − | | data-sort-value="1" | <img src=' | + | | data-sort-value="1" | <img src='https://pokelife.pl/images/typy/1.jpg' height='25px' style='margin: 0;'/> |
| − | |||
| 70 | | 70 | ||
| 100 | | 100 | ||
| − | | Po trafieniu 30% szansy na | + | | Po trafieniu 30% szansy na specjalny efekt. Efekt jest zależny od Dziczy w której odbywa się walka. Każda Dzicz ma przypisany jeden efekt z następujących: Podpalenie, Paraliż, Uśpienie, Zamrożenie, obniżenie Ataku przeciwnika o 1 poziom (5%), obniżenie Sp Ataku przeciwnika o 1 poziom (5%), obniżenie Szybkości przeciwnika o 1 poziom (5%), obniżenie Celności przeciwnika o 1 poziom (5%). Poza Dziczami wybranym efektem jest Paraliż. |
| − | |||
| − | |||
| − | |||
| − | |||
| − | |||
| − | |||
| − | |||
| − | |||
| − | |||
| − | |||
| − | |||
| − | |||
| − | |||
| − | |||
| − | |||
| − | |||
|- | |- | ||
| '''[[Dragon Pulse|TM 139 Dragon Pulse]]''' | | '''[[Dragon Pulse|TM 139 Dragon Pulse]]''' | ||
| − | | data-sort-value="17" | <img src=' | + | | data-sort-value="17" | <img src='https://pokelife.pl/images/typy/17.png' height='25px' style='margin: 0;'/> |
| − | | data-sort-value="2" | <img src=' | + | | data-sort-value="2" | <img src='https://pokelife.pl/images/typy/2.jpg' height='25px' style='margin: 0;'/> |
| − | |||
| 85 | | 85 | ||
| 100 | | 100 | ||
| Zadaje obrażenia. | | Zadaje obrażenia. | ||
| + | |- | ||
| + | | '''[[Giga Impact|TM 145 Giga Impact]]''' | ||
| + | | data-sort-value="1" | <img src='https://pokelife.pl/images/typy/1.png' height='25px' style='margin: 0;'/> | ||
| + | | data-sort-value="1" | <img src='https://pokelife.pl/images/typy/1.jpg' height='25px' style='margin: 0;'/> | ||
| + | | 150 | ||
| + | | 90 | ||
| + | | W drugiej rundzie odpoczywa regenerując siły. | ||
|- | |- | ||
| '''[[Captivate|TM 151 Captivate]]''' | | '''[[Captivate|TM 151 Captivate]]''' | ||
| − | | data-sort-value="1" | <img src=' | + | | data-sort-value="1" | <img src='https://pokelife.pl/images/typy/1.png' height='25px' style='margin: 0;'/> |
| − | | data-sort-value="3" | <img src=' | + | | data-sort-value="3" | <img src='https://pokelife.pl/images/typy/3.jpg' height='25px' style='margin: 0;'/> |
| − | |||
| - | | - | ||
| 100 | | 100 | ||
| Linia 640: | Linia 504: | ||
|- | |- | ||
| '''[[Natural Gift|TM 154 Natural Gift]]''' | | '''[[Natural Gift|TM 154 Natural Gift]]''' | ||
| − | | data-sort-value="1" | <img src=' | + | | data-sort-value="1" | <img src='https://pokelife.pl/images/typy/1.png' height='25px' style='margin: 0;'/> |
| − | | data-sort-value="1" | <img src=' | + | | data-sort-value="1" | <img src='https://pokelife.pl/images/typy/1.jpg' height='25px' style='margin: 0;'/> |
| − | |||
| 80 | | 80 | ||
| 100 | | 100 | ||
| Linia 648: | Linia 511: | ||
|- | |- | ||
| '''[[Round|TM 179 Round]]''' | | '''[[Round|TM 179 Round]]''' | ||
| − | | data-sort-value="1" | <img src=' | + | | data-sort-value="1" | <img src='https://pokelife.pl/images/typy/1.png' height='25px' style='margin: 0;'/> |
| − | | data-sort-value="2" | <img src=' | + | | data-sort-value="2" | <img src='https://pokelife.pl/images/typy/2.jpg' height='25px' style='margin: 0;'/> |
| − | |||
| 60 | | 60 | ||
| 100 | | 100 | ||
| Linia 656: | Linia 518: | ||
|- | |- | ||
| '''[[Incinerate|TM 183 Incinerate]]''' | | '''[[Incinerate|TM 183 Incinerate]]''' | ||
| − | | data-sort-value="2" | <img src=' | + | | data-sort-value="2" | <img src='https://pokelife.pl/images/typy/2.png' height='25px' style='margin: 0;'/> |
| − | | data-sort-value="2" | <img src=' | + | | data-sort-value="2" | <img src='https://pokelife.pl/images/typy/2.jpg' height='25px' style='margin: 0;'/> |
| − | |||
| 60 | | 60 | ||
| 100 | | 100 | ||
| − | | | + | | Całkowicie niszczy trzymany klejnot przeciwnika na czas walki. |
|- | |- | ||
| '''[[Dragon Tail|TM 192 Dragon Tail]]''' | | '''[[Dragon Tail|TM 192 Dragon Tail]]''' | ||
| − | | data-sort-value="17" | <img src=' | + | | data-sort-value="17" | <img src='https://pokelife.pl/images/typy/17.png' height='25px' style='margin: 0;'/> |
| − | | data-sort-value="1" | <img src=' | + | | data-sort-value="1" | <img src='https://pokelife.pl/images/typy/1.jpg' height='25px' style='margin: 0;'/> |
| − | |||
| 60 | | 60 | ||
| 90 | | 90 | ||
| Atak o priorytecie -6. | | Atak o priorytecie -6. | ||
|- | |- | ||
| − | | '''[[ | + | | '''[[Confide|TM 215 Confide]]''' |
| − | | data-sort-value="1" | <img src=' | + | | data-sort-value="1" | <img src='https://pokelife.pl/images/typy/1.png' height='25px' style='margin: 0;'/> |
| − | | data-sort-value="1" | <img src=' | + | | data-sort-value="3" | <img src='https://pokelife.pl/images/typy/3.jpg' height='25px' style='margin: 0;'/> |
| − | | 15 | + | | - |
| + | | 1000 | ||
| + | | Obniża Specjalny atak przeciwnika o jeden poziom (5%). Działa pomimo użycia przez przeciwnika Protect czy Detect. | ||
| + | |- | ||
| + | | '''[[Waterfall|TM 220 Waterfall]]''' | ||
| + | | data-sort-value="3" | <img src='https://pokelife.pl/images/typy/3.png' height='25px' style='margin: 0;'/> | ||
| + | | data-sort-value="1" | <img src='https://pokelife.pl/images/typy/1.jpg' height='25px' style='margin: 0;'/> | ||
| + | | 80 | ||
| + | | 100 | ||
| + | | Po trafieniu 20% szansy na oszołomienie przeciwnika. | ||
| + | |- | ||
| + | | '''[[Surf|TM 221 Surf]]''' | ||
| + | | data-sort-value="3" | <img src='https://pokelife.pl/images/typy/3.png' height='25px' style='margin: 0;'/> | ||
| + | | data-sort-value="2" | <img src='https://pokelife.pl/images/typy/2.jpg' height='25px' style='margin: 0;'/> | ||
| + | | 90 | ||
| + | | 100 | ||
| + | | Zadaje obrażenia, moc 2x większa jeśli trafi w Pokemona używającego Dive. | ||
| + | |- | ||
| + | | '''[[Brutal Swing|TM 225 Brutal Swing]]''' | ||
| + | | data-sort-value="15" | <img src='https://pokelife.pl/images/typy/15.png' height='25px' style='margin: 0;'/> | ||
| + | | data-sort-value="1" | <img src='https://pokelife.pl/images/typy/1.jpg' height='25px' style='margin: 0;'/> | ||
| + | | 60 | ||
| + | | 100 | ||
| + | | Zadaje obrażenia. | ||
| + | |- | ||
| + | | '''[[Hidden Power|TM 227 Hidden Power]]''' | ||
| + | | data-sort-value="0" | <img src='https://pokelife.pl/images/typy/0.png' height='25px' style='margin: 0;'/> | ||
| + | | data-sort-value="2" | <img src='https://pokelife.pl/images/typy/2.jpg' height='25px' style='margin: 0;'/> | ||
| + | | 60 | ||
| + | | 100 | ||
| + | | Typ ruchu losowany z ID Pokemona jako stały seed - oznacza to, że dany Pokemon będzie miał zawsze ten sam typ tego ataku. | ||
| + | |} | ||
| + | |||
| + | |||
| + | |||
| + | == Nauczyciel Ruchów == | ||
| + | |||
| + | {| class="sortable Tabela1" | ||
| + | |- | ||
| + | ! width='12%' class="unsortable" | '''Posunięcie''' | ||
| + | ! width='3%' data-sort-type="number" | '''Typ''' | ||
| + | ! width='3%' data-sort-type="number" | '''Kategoria''' | ||
| + | ! width='6%' data-sort-type="number" | '''Moc''' | ||
| + | ! width='3%' data-sort-type="number" | '''Celność''' | ||
| + | ! width='38%' class="unsortable" | '''Efekt''' | ||
| + | |- | ||
| + | | '''[[Bind]]''' | ||
| + | | data-sort-value="1" | <img src='https://pokelife.pl/images/typy/1.png' height='25px' style='margin: 0;'/> | ||
| + | | data-sort-value="1" | <img src='https://pokelife.pl/images/typy/1.jpg' height='25px' style='margin: 0;'/> | ||
| 15 | | 15 | ||
| 85 | | 85 | ||
| Więzi przeciwnika na 4-5 rund zadając przy tym obrażenia. | | Więzi przeciwnika na 4-5 rund zadając przy tym obrażenia. | ||
|- | |- | ||
| − | | '''[[ | + | | '''[[Headbutt]]''' |
| − | | data-sort-value="1" | <img src=' | + | | data-sort-value="1" | <img src='https://pokelife.pl/images/typy/1.png' height='25px' style='margin: 0;'/> |
| − | | data-sort-value="3" | <img src=' | + | | data-sort-value="1" | <img src='https://pokelife.pl/images/typy/1.jpg' height='25px' style='margin: 0;'/> |
| − | | | + | | 70 |
| + | | 100 | ||
| + | | Po trafieniu 30% szansy na Oszołomienie przeciwnika. | ||
| + | |- | ||
| + | | '''[[Body Slam]]''' | ||
| + | | data-sort-value="1" | <img src='https://pokelife.pl/images/typy/1.png' height='25px' style='margin: 0;'/> | ||
| + | | data-sort-value="1" | <img src='https://pokelife.pl/images/typy/1.jpg' height='25px' style='margin: 0;'/> | ||
| + | | 85 | ||
| + | | 100 | ||
| + | | Jeśli wcześniej (nieważne jak dawno temu) przeciwnik użył Minimize, to Body Slam zawsze trafi i podwaja moc. Posiada 30% szans na paraliż przeciwnika. | ||
| + | |- | ||
| + | | '''[[Double-Edge]]''' | ||
| + | | data-sort-value="1" | <img src='https://pokelife.pl/images/typy/1.png' height='25px' style='margin: 0;'/> | ||
| + | | data-sort-value="1" | <img src='https://pokelife.pl/images/typy/1.jpg' height='25px' style='margin: 0;'/> | ||
| + | | 120 | ||
| + | | 100 | ||
| + | | Po trafieniu używający otrzymuje 33% obrażeń zwrotnych. | ||
| + | |- | ||
| + | | '''[[Flamethrower]]''' | ||
| + | | data-sort-value="2" | <img src='https://pokelife.pl/images/typy/2.png' height='25px' style='margin: 0;'/> | ||
| + | | data-sort-value="2" | <img src='https://pokelife.pl/images/typy/2.jpg' height='25px' style='margin: 0;'/> | ||
| + | | 90 | ||
| + | | 100 | ||
| + | | Po trafieniu 10% szans na podpalenie przeciwnika. | ||
| + | |- | ||
| + | | '''[[Ice Beam]]''' | ||
| + | | data-sort-value="14" | <img src='https://pokelife.pl/images/typy/14.png' height='25px' style='margin: 0;'/> | ||
| + | | data-sort-value="2" | <img src='https://pokelife.pl/images/typy/2.jpg' height='25px' style='margin: 0;'/> | ||
| + | | 90 | ||
| + | | 100 | ||
| + | | Po trafieniu 10% szansy na zamrożenie przeciwnika. | ||
| + | |- | ||
| + | | '''[[Thunderbolt]]''' | ||
| + | | data-sort-value="5" | <img src='https://pokelife.pl/images/typy/5.png' height='25px' style='margin: 0;'/> | ||
| + | | data-sort-value="2" | <img src='https://pokelife.pl/images/typy/2.jpg' height='25px' style='margin: 0;'/> | ||
| + | | 90 | ||
| + | | 100 | ||
| + | | Po trafieniu 10% szansy na sparaliżowanie przeciwnika. | ||
| + | |- | ||
| + | | '''[[Thunder Wave]]''' | ||
| + | | data-sort-value="5" | <img src='https://pokelife.pl/images/typy/5.png' height='25px' style='margin: 0;'/> | ||
| + | | data-sort-value="3" | <img src='https://pokelife.pl/images/typy/3.jpg' height='25px' style='margin: 0;'/> | ||
| + | | - | ||
| + | | 90 | ||
| + | | Po trafieniu paraliżuje przeciwnika. | ||
| + | |- | ||
| + | | '''[[Mimic]]''' | ||
| + | | data-sort-value="1" | <img src='https://pokelife.pl/images/typy/1.png' height='25px' style='margin: 0;'/> | ||
| + | | data-sort-value="3" | <img src='https://pokelife.pl/images/typy/3.jpg' height='25px' style='margin: 0;'/> | ||
| + | | 1 | ||
| + | | 100 | ||
| + | | Uczy się ostatniego posunięcia przeciwnika (musi być wykonane w tej samej rundzie przed użyciem tego ruchu) i używa go do końca walki (zamiast Mimic). | ||
| + | |- | ||
| + | | '''[[Swift]]''' | ||
| + | | data-sort-value="1" | <img src='https://pokelife.pl/images/typy/1.png' height='25px' style='margin: 0;'/> | ||
| + | | data-sort-value="2" | <img src='https://pokelife.pl/images/typy/2.jpg' height='25px' style='margin: 0;'/> | ||
| + | | 60 | ||
| + | | 1000 | ||
| + | | Zawsze trafia. | ||
| + | |- | ||
| + | | '''[[Snore]]''' | ||
| + | | data-sort-value="1" | <img src='https://pokelife.pl/images/typy/1.png' height='25px' style='margin: 0;'/> | ||
| + | | data-sort-value="2" | <img src='https://pokelife.pl/images/typy/2.jpg' height='25px' style='margin: 0;'/> | ||
| + | | 50 | ||
| + | | 100 | ||
| + | | Ruch dojdzie do skutku jedynie kiedy zostanie użyty podczas snu. Jeśli ruch jest następny w kolejności po rundzie, w której Pokemon zasnął, zostanie on wykonany. Wykonanie ruchu nie przedłuża czasu trwania snu. | ||
| + | |- | ||
| + | | '''[[Icy Wind]]''' | ||
| + | | data-sort-value="14" | <img src='https://pokelife.pl/images/typy/14.png' height='25px' style='margin: 0;'/> | ||
| + | | data-sort-value="2" | <img src='https://pokelife.pl/images/typy/2.jpg' height='25px' style='margin: 0;'/> | ||
| + | | 55 | ||
| + | | 95 | ||
| + | | Po trafieniu zmniejsza Szybkość przeciwnika o 1 poziom (5%). | ||
| + | |- | ||
| + | | '''[[Outrage]]''' | ||
| + | | data-sort-value="17" | <img src='https://pokelife.pl/images/typy/17.png' height='25px' style='margin: 0;'/> | ||
| + | | data-sort-value="1" | <img src='https://pokelife.pl/images/typy/1.jpg' height='25px' style='margin: 0;'/> | ||
| + | | 120 | ||
| + | | 100 | ||
| + | | Pokemon atakuje przez 2-3 rundy po czym używający popada w Dezorientacje (lub gdy spudłuje). Każda runda ma osobną szansę na trafienie. Działanie ataku jest od razu przerywane jeśli Pokemon nie trafi, wykonanie ruchu będzie niemożliwe (Paraliż, Dezorientacja, Zamrożenie) lub zaatakuje Pokemona używającego Fly, Dig bądź odpornego na typ. | ||
| + | |- | ||
| + | | '''[[Endure]]''' | ||
| + | | data-sort-value="1" | <img src='https://pokelife.pl/images/typy/1.png' height='25px' style='margin: 0;'/> | ||
| + | | data-sort-value="3" | <img src='https://pokelife.pl/images/typy/3.jpg' height='25px' style='margin: 0;'/> | ||
| + | | - | ||
| + | | 100 | ||
| + | | Przez 2 rundy nie można powalić Pokemona bezpośrednim atakiem (efekt znika po zablokowaniu pierwszego ruchu). Szansa na zadziałanie efektu ruchu jest zmniejszana o -5% za każde skuteczne przetrwanie ataku. Inne ruchy ohronne (Protect, Detect, Endure, Quick Guard, Spiky Shield, King's Shield, Baneful Bunker) dzielą tą samą szansę zadziałania efektu. Dodatkowo jeśli Pokemon posiada więcej niż jeden ruch ochronny, minimalna szansa na zadziałanie (równa 50%) jest dzielona przez 2 za każdy ruch ochronny ponad pierwszy.. | ||
| + | |- | ||
| + | | '''[[Swagger]]''' | ||
| + | | data-sort-value="1" | <img src='https://pokelife.pl/images/typy/1.png' height='25px' style='margin: 0;'/> | ||
| + | | data-sort-value="3" | <img src='https://pokelife.pl/images/typy/3.jpg' height='25px' style='margin: 0;'/> | ||
| + | | - | ||
| + | | 85 | ||
| + | | Po udanym użyciu zwiększa Atak przeciwnika o 2 poziomy (10%) ale także go Dezorientuje. | ||
| + | |- | ||
| + | | '''[[Sleep Talk]]''' | ||
| + | | data-sort-value="1" | <img src='https://pokelife.pl/images/typy/1.png' height='25px' style='margin: 0;'/> | ||
| + | | data-sort-value="3" | <img src='https://pokelife.pl/images/typy/3.jpg' height='25px' style='margin: 0;'/> | ||
| - | | - | ||
| + | | 100 | ||
| + | | Jeśli Pokemon śpi podczas użycia tego ruchu (został uśpiony w tej samej rundzie przed użyciem tego ruchu lub ruch jest następny w kolejce), zostanie wybrany jeden z pozostałych ruchów i użyty podczas snu. Wykonanie ruchu nie przedłuża trwania snu. Nie wszystkie ruchy mogą być wybrane do użycia (odpadają ruchy wielorundowe i inne zmieniające ruch). | ||
| + | |- | ||
| + | | '''[[Iron Tail]]''' | ||
| + | | data-sort-value="11" | <img src='https://pokelife.pl/images/typy/11.png' height='25px' style='margin: 0;'/> | ||
| + | | data-sort-value="1" | <img src='https://pokelife.pl/images/typy/1.jpg' height='25px' style='margin: 0;'/> | ||
| + | | 100 | ||
| + | | 75 | ||
| + | | Po trafieniu 30% szansy na zmniejszenie Obrony przeciwnika. | ||
| + | |- | ||
| + | | '''[[Twister]]''' | ||
| + | | data-sort-value="17" | <img src='https://pokelife.pl/images/typy/17.png' height='25px' style='margin: 0;'/> | ||
| + | | data-sort-value="2" | <img src='https://pokelife.pl/images/typy/2.jpg' height='25px' style='margin: 0;'/> | ||
| + | | 40 | ||
| + | | 100 | ||
| + | | Trafia z podwójną mocą Pokemony w trakcie Fly, Bounce i Sky Drop. Po trafieniu 20% szansy na oszołomienie przeciwnika. | ||
| + | |- | ||
| + | | '''[[Shock Wave]]''' | ||
| + | | data-sort-value="5" | <img src='https://pokelife.pl/images/typy/5.png' height='25px' style='margin: 0;'/> | ||
| + | | data-sort-value="2" | <img src='https://pokelife.pl/images/typy/2.jpg' height='25px' style='margin: 0;'/> | ||
| + | | 60 | ||
| 1000 | | 1000 | ||
| − | | | + | | Zawsze trafia. |
| − | | | + | |- |
| + | | '''[[Water Pulse]]''' | ||
| + | | data-sort-value="3" | <img src='https://pokelife.pl/images/typy/3.png' height='25px' style='margin: 0;'/> | ||
| + | | data-sort-value="2" | <img src='https://pokelife.pl/images/typy/2.jpg' height='25px' style='margin: 0;'/> | ||
| + | | 60 | ||
| + | | 100 | ||
| + | | Po trafieniu 20% szansy na Zdezorientowanie przeciwnika. | ||
| + | |- | ||
| + | | '''[[Aqua Tail]]''' | ||
| + | | data-sort-value="3" | <img src='https://pokelife.pl/images/typy/3.png' height='25px' style='margin: 0;'/> | ||
| + | | data-sort-value="1" | <img src='https://pokelife.pl/images/typy/1.jpg' height='25px' style='margin: 0;'/> | ||
| + | | 90 | ||
| + | | 90 | ||
| + | | Zadaje obrażenia. | ||
| + | |- | ||
| + | | '''[[Dragon Pulse]]''' | ||
| + | | data-sort-value="17" | <img src='https://pokelife.pl/images/typy/17.png' height='25px' style='margin: 0;'/> | ||
| + | | data-sort-value="2" | <img src='https://pokelife.pl/images/typy/2.jpg' height='25px' style='margin: 0;'/> | ||
| + | | 85 | ||
| + | | 100 | ||
| + | | Zadaje obrażenia. | ||
| + | |- | ||
| + | | '''[[Draco Meteor]]''' | ||
| + | | data-sort-value="17" | <img src='https://pokelife.pl/images/typy/17.png' height='25px' style='margin: 0;'/> | ||
| + | | data-sort-value="2" | <img src='https://pokelife.pl/images/typy/2.jpg' height='25px' style='margin: 0;'/> | ||
| + | | 130 | ||
| + | | 90 | ||
| + | | Po trafieniu obniża Specjalny Atak używającego o dwa poziomy (10%). | ||
| + | |} | ||
| + | |||
Aktualna wersja na dzień 18:23, 21 gru 2022
| #147 Dratini | #148 Dragonair (Lista Pokemonów) | #149 Dragonite |
Dragonair
|
 Zwykły |
 Shiny |
| ||||||||||||||||||||||||||||||||||||
| |||||||||||||||||||||||||||||||||||||||
| |||||||||||||||||||||||||||||||||||||||
 Smok
Smok 


Wygląd i zachowanie
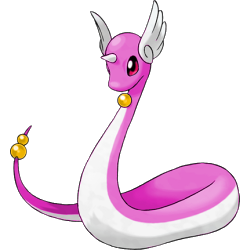
Dragonairy są długie, mogą osiągnąć długość do 4 metrów. Mają duże ciemne, błyszczące oczy i mały róg na czole. Po obu stronach głowy mają małe pierzaste białe skrzydła. Dragonairy są koloru szafirowego z wyjątkiem brzucha, który jest biały. Pod szyją i na końcu ogona ma niebieską "kulę" (na ogonie dwie).
Dragonairy są posłusznymi pokemonami. Mimo, że są nieśmiałe, mają ogromną moc, są potężnymi smokami. Dragonairy mogą zrzucać skórę i pozbywać się niechcianych dolegliwości, jak np. zatrucie. Wytwarza delikatną aurę wyczuwalną przez ludzi. Potrafią rozwijać skrzydła na głowie i latać dzięki nim. Kryształowe kule pozwalają mu kontrolować pogodę lub wytwarzać światło.
Posunięcia
| Posunięcie | Typ | Kategoria | Min lvl | Moc | Celność | Efekt |
|---|---|---|---|---|---|---|
| Wrap | 
|

|
start | 15 | 90 | Więzi przeciwnika na 4-5 rund zadając przy tym obrażenia. |
| Leer |
|

|
start | - | 100 | Zmniejsza Obronę przeciwnika o 1 poziom (5%). |
| Thunder Wave | 
|
|
start | - | 90 | Po trafieniu paraliżuje przeciwnika. |
| Twister | 
|

|
start | 40 | 100 | Trafia z podwójną mocą Pokemony w trakcie Fly, Bounce i Sky Drop. Po trafieniu 20% szansy na oszołomienie przeciwnika. |
| Dragon Rage |
|
|
start | 40 | 100 | Ignoruje modyfikatory odporności oraz obron/ataków |
| Dragon Tail |
|
|
start | 60 | 90 | Atak o priorytecie -6. |
| Agility | 
|
|
start | - | 100 | Zwiększa szybkość używającego o 2 poziomy (10%). |
| Slam |
|
|
start | 80 | 75 | Zadaje obrażenia. |
| Aqua Tail | 
|
|
33 | 90 | 90 | Zadaje obrażenia. |
| Dragon Rush |
|
|
39 | 100 | 75 | Jeśli przeciwnik użył wcześniej Minimize to zawsze trafia z podwojoną mocą. Po trafieniu 20% szansy na oszołomienie przeciwnika. |
| Safeguard |
|
|
46 | - | 100 | Po użyciu chroni używającego przed atakami zmieniającymi stan: paraliż, dezorientacja itd. Działa 3 rundy. |
| Rain Dance |
|
|
53 | - | 100 | Przywołuje pogodę - Deszcz. |
| Dragon Dance |
|
|
60 | - | 100 | Zwiększa Atak i Szybkość używającego o 1 poziom (5%). |
| Outrage |
|
|
67 | 120 | 100 | Pokemon atakuje przez 2-3 rundy po czym używający popada w Dezorientacje (lub gdy spudłuje). Każda runda ma osobną szansę na trafienie. Działanie ataku jest od razu przerywane jeśli Pokemon nie trafi, wykonanie ruchu będzie niemożliwe (Paraliż, Dezorientacja, Zamrożenie) lub zaatakuje Pokemona używającego Fly, Dig bądź odpornego na typ. |
| Hyper Beam |
|
|
74 | 150 | 90 | W drugiej rundzie odpoczywa regenerując siły. |
Dostępne TM
| Posunięcie | Typ | Kategoria | Moc | Celność | Efekt |
|---|---|---|---|---|---|
| TM 6 Toxic | 
|
|
- | 90 | Atak sam w sobie nie zadaje obrażeń, lecz ma dwa stopnie - zatrucia oraz zatrucia śmiertelnego, które zadaje podwójne obrażenia w stosunku do tego pierwszego. Zawsze trafia, gdy zostanie użyty przez trującego Pokemona. |
| TM 8 Body Slam |
|
|
85 | 100 | Jeśli wcześniej (nieważne jak dawno temu) przeciwnik użył Minimize, to Body Slam zawsze trafi i podwaja moc. Posiada 30% szans na paraliż przeciwnika. |
| TM 13 Ice Beam | 
|
|
90 | 100 | Po trafieniu 10% szansy na zamrożenie przeciwnika. |
| TM 14 Blizzard |
|
|
110 | 70 | Po trafieniu 10% szansy na zamrożenie przeciwnika. Podczas użycia Hail ignoruje celność i uniki przeciwnika, więc zawsze trafia. |
| TM 15 Hyper Beam |
|
|
150 | 90 | W drugiej rundzie odpoczywa regenerując siły. |
| TM 24 Thunderbolt |
|
|
90 | 100 | Po trafieniu 10% szansy na sparaliżowanie przeciwnika. |
| TM 25 Thunder |
|
|
110 | 70 | Po trafieniu 30% szansy na sparaliżowanie przeciwnika. Trafia w trakcie Fly, Bounce i Sky Drop. W trakcje Ostrego Słońca celność spada o 50%, a w trakcie Deszczu ma pewne trafienie. |
| TM 32 Double Team |
|
|
- | 100 | Zwiększa Unik używającego o 1 poziom (5%). |
| TM 38 Fire Blast | 
|
|
110 | 85 | Po trafieniu 10% szans na podpalenie przeciwnika. |
| TM 39 Swift |
|
|
60 | 1000 | Zawsze trafia. |
| TM 44 Rest |
|
|
- | 100 | W pierwszej rundzie leczy 25% aktualnego zdrowia pokemona oraz, jeśli pokemon dalej śpi pod koniec kolejnej rundy, leczy o kolejne 20% zdrowia z rundy, w której Rest został użyty. Dodatkowo ma 100% szans na usunięcie statusów (poparzenie, trucizna, paraliż). Po użyciu Rest, Pokemon śpi rundę, po czym w drugiej budzi się i używa następnego ataku. |
| TM 45 Thunder Wave |
|
|
- | 90 | Po trafieniu paraliżuje przeciwnika. |
| TM 51 Headbutt |
|
|
70 | 100 | Po trafieniu 30% szansy na Oszołomienie przeciwnika. |
| TM 52 Curse | 
|
|
- | 100 | Po użyciu działanie tego ataku jest zależne od tego, jakiego typu Pokemon go używa. Jeśli a) duch - Pokemon odbiera sobie 25% obecnego HP. Przeciwnik zostaje przeklęty i co rundę, przez 3 rundy, traci ilość życia równą 40% tego ile odjął sobie atakujący Pok. Czyli w sumie 120%. b) inny typ niż duch - obniżamy swoją szybkość, ale podwyższamy Atak i Obronę o 1 poziom (5%). |
| TM 54 Zap Cannon |
|
|
120 | 50 | Po trafieniu Paraliżuje przeciwnika. Jeśli przeciwnik ma wyższą Szybkość, szansa na Paraliż zostanie zmniejszona do 30%. |
| TM 57 Sunny Day |
|
|
- | 100 | Przywołuje pogodę - Ostre Słońce |
| TM 59 Snore |
|
|
50 | 100 | Ruch dojdzie do skutku jedynie kiedy zostanie użyty podczas snu. Jeśli ruch jest następny w kolejności po rundzie, w której Pokemon zasnął, zostanie on wykonany. Wykonanie ruchu nie przedłuża czasu trwania snu. |
| TM 60 Icy Wind |
|
|
55 | 95 | Po trafieniu zmniejsza Szybkość przeciwnika o 1 poziom (5%). |
| TM 61 Protect |
|
|
- | 100 | Po użyciu zablokuje następny, niestatusowy ruch przeciwnika. Atak o priorytecie 4. Szansa na zadziałanie efektu ruchu jest zmniejszana o -5% za każde skuteczne zablokowanie ruchu. Inne ruchy ohronne (Protect, Detect, Endure, Quick Guard, Spiky Shield, King's Shield, Baneful Bunker) dzielą tą samą szansę zadziałania efektu. Dodatkowo jeśli Pokemon posiada więcej niż jeden ruch ochronny, minimalna szansa na zadziałanie (równa 50%) jest dzielona przez 2 za każdy ruch ochronny ponad pierwszy. |
| TM 62 Rain Dance |
|
|
- | 100 | Przywołuje pogodę - Deszcz. |
| TM 64 Endure |
|
|
- | 100 | Przez 2 rundy nie można powalić Pokemona bezpośrednim atakiem (efekt znika po zablokowaniu pierwszego ruchu). Szansa na zadziałanie efektu ruchu jest zmniejszana o -5% za każde skuteczne przetrwanie ataku. Inne ruchy ohronne (Protect, Detect, Endure, Quick Guard, Spiky Shield, King's Shield, Baneful Bunker) dzielą tą samą szansę zadziałania efektu. Dodatkowo jeśli Pokemon posiada więcej niż jeden ruch ochronny, minimalna szansa na zadziałanie (równa 50%) jest dzielona przez 2 za każdy ruch ochronny ponad pierwszy.. |
| TM 65 Frustration |
|
|
60 | 100 | Moc zależna od przywiązania używającego. Moc 1 na 100% przywiązania oraz 102 na 0% (minusowe również 102). |
| TM 66 Iron Tail | 
|
|
100 | 75 | Po trafieniu 30% szansy na zmniejszenie Obrony przeciwnika. |
| TM 67 Dragon Breath |
|
|
60 | 100 | Po trafieniu 30% szansy na sparaliżowanie przeciwnika. |
| TM 68 Return |
|
|
60 | 100 | Moc wynosi 2 plus procent przywiązania Pokemona (maksymalnie 102). |
| TM 75 Detect | 
|
|
- | 100 | Po użyciu zablokuje następny, niestatusowy ruch przeciwnika. Atak o priorytecie 4. Szansa na zadziałanie efektu ruchu jest zmniejszana o -5% za każde skuteczne zablokowanie ruchu. Inne ruchy ohronne (Protect, Detect, Endure, Quick Guard, Spiky Shield, King's Shield, Baneful Bunker) dzielą tą samą szansę zadziałania efektu. Dodatkowo jeśli Pokemon posiada więcej niż jeden ruch ochronny, minimalna szansa na zadziałanie (równa 50%) jest dzielona przez 2 za każdy ruch ochronny ponad pierwszy. |
| TM 76 Attract |
|
|
- | 100 | Po trafieniu wprowadza przeciwnika w stan zakochania. Zakochanie trwa 2 rundy, podczas których Pokemon ma 50% na zaatakowanie. Działa tylko jeśli pokemony są przeciwnych płci. |
| TM 82 Swagger |
|
|
- | 85 | Po udanym użyciu zwiększa Atak przeciwnika o 2 poziomy (10%) ale także go Dezorientuje. |
| TM 83 Sleep Talk |
|
|
- | 100 | Jeśli Pokemon śpi podczas użycia tego ruchu (został uśpiony w tej samej rundzie przed użyciem tego ruchu lub ruch jest następny w kolejce), zostanie wybrany jeden z pozostałych ruchów i użyty podczas snu. Wykonanie ruchu nie przedłuża trwania snu. Nie wszystkie ruchy mogą być wybrane do użycia (odpadają ruchy wielorundowe i inne zmieniające ruch). |
| TM 84 Flamethrower |
|
|
90 | 100 | Po trafieniu 10% szans na podpalenie przeciwnika. |
| TM 87 Outrage |
|
|
120 | 100 | Pokemon atakuje przez 2-3 rundy po czym używający popada w Dezorientacje (lub gdy spudłuje). Każda runda ma osobną szansę na trafienie. Działanie ataku jest od razu przerywane jeśli Pokemon nie trafi, wykonanie ruchu będzie niemożliwe (Paraliż, Dezorientacja, Zamrożenie) lub zaatakuje Pokemona używającego Fly, Dig bądź odpornego na typ. |
| TM 95 Water Pulse |
|
|
60 | 100 | Po trafieniu 20% szansy na Zdezorientowanie przeciwnika. |
| TM 100 Hail |
|
|
- | 100 | Przywołuje pogodę - Grad. |
| TM 101 Light Screen |
|
|
- | 100 | Obniża o 40% obrażenia od specjalnych ataków na 3 rundy (z wyjątkiem obrażeń niezależnych od mocy). |
| TM 102 Safeguard |
|
|
- | 100 | Po użyciu chroni używającego przed atakami zmieniającymi stan: paraliż, dezorientacja itd. Działa 3 rundy. |
| TM 104 Shock Wave |
|
|
60 | 1000 | Zawsze trafia. |
| TM 108 Facade |
|
|
70 | 100 | Podstawowa moc 70. Moc 140 kiedy użytkownik jest sparaliżowany, zatruty lub płonie. |
| TM 109 Secret Power |
|
|
70 | 100 | Po trafieniu 30% szansy na specjalny efekt. Efekt jest zależny od Dziczy w której odbywa się walka. Każda Dzicz ma przypisany jeden efekt z następujących: Podpalenie, Paraliż, Uśpienie, Zamrożenie, obniżenie Ataku przeciwnika o 1 poziom (5%), obniżenie Sp Ataku przeciwnika o 1 poziom (5%), obniżenie Szybkości przeciwnika o 1 poziom (5%), obniżenie Celności przeciwnika o 1 poziom (5%). Poza Dziczami wybranym efektem jest Paraliż. |
| TM 139 Dragon Pulse |
|
|
85 | 100 | Zadaje obrażenia. |
| TM 145 Giga Impact |
|
|
150 | 90 | W drugiej rundzie odpoczywa regenerując siły. |
| TM 151 Captivate |
|
|
- | 100 | Obniża atak specjalny przeciwka o dwa poziomy (10%). Działa tylko jeśli pokemony są przeciwnych płci. |
| TM 154 Natural Gift |
|
|
80 | 100 | Zadaje obrażenia. |
| TM 179 Round |
|
|
60 | 100 | Zadaje obrażenia. |
| TM 183 Incinerate |
|
|
60 | 100 | Całkowicie niszczy trzymany klejnot przeciwnika na czas walki. |
| TM 192 Dragon Tail |
|
|
60 | 90 | Atak o priorytecie -6. |
| TM 215 Confide |
|
|
- | 1000 | Obniża Specjalny atak przeciwnika o jeden poziom (5%). Działa pomimo użycia przez przeciwnika Protect czy Detect. |
| TM 220 Waterfall |
|
|
80 | 100 | Po trafieniu 20% szansy na oszołomienie przeciwnika. |
| TM 221 Surf |
|
|
90 | 100 | Zadaje obrażenia, moc 2x większa jeśli trafi w Pokemona używającego Dive. |
| TM 225 Brutal Swing | 
|
|
60 | 100 | Zadaje obrażenia. |
| TM 227 Hidden Power | 
|
|
60 | 100 | Typ ruchu losowany z ID Pokemona jako stały seed - oznacza to, że dany Pokemon będzie miał zawsze ten sam typ tego ataku. |
Nauczyciel Ruchów
| Posunięcie | Typ | Kategoria | Moc | Celność | Efekt |
|---|---|---|---|---|---|
| Bind |
|
|
15 | 85 | Więzi przeciwnika na 4-5 rund zadając przy tym obrażenia. |
| Headbutt |
|
|
70 | 100 | Po trafieniu 30% szansy na Oszołomienie przeciwnika. |
| Body Slam |
|
|
85 | 100 | Jeśli wcześniej (nieważne jak dawno temu) przeciwnik użył Minimize, to Body Slam zawsze trafi i podwaja moc. Posiada 30% szans na paraliż przeciwnika. |
| Double-Edge |
|
|
120 | 100 | Po trafieniu używający otrzymuje 33% obrażeń zwrotnych. |
| Flamethrower |
|
|
90 | 100 | Po trafieniu 10% szans na podpalenie przeciwnika. |
| Ice Beam |
|
|
90 | 100 | Po trafieniu 10% szansy na zamrożenie przeciwnika. |
| Thunderbolt |
|
|
90 | 100 | Po trafieniu 10% szansy na sparaliżowanie przeciwnika. |
| Thunder Wave |
|
|
- | 90 | Po trafieniu paraliżuje przeciwnika. |
| Mimic |
|
|
1 | 100 | Uczy się ostatniego posunięcia przeciwnika (musi być wykonane w tej samej rundzie przed użyciem tego ruchu) i używa go do końca walki (zamiast Mimic). |
| Swift |
|
|
60 | 1000 | Zawsze trafia. |
| Snore |
|
|
50 | 100 | Ruch dojdzie do skutku jedynie kiedy zostanie użyty podczas snu. Jeśli ruch jest następny w kolejności po rundzie, w której Pokemon zasnął, zostanie on wykonany. Wykonanie ruchu nie przedłuża czasu trwania snu. |
| Icy Wind |
|
|
55 | 95 | Po trafieniu zmniejsza Szybkość przeciwnika o 1 poziom (5%). |
| Outrage |
|
|
120 | 100 | Pokemon atakuje przez 2-3 rundy po czym używający popada w Dezorientacje (lub gdy spudłuje). Każda runda ma osobną szansę na trafienie. Działanie ataku jest od razu przerywane jeśli Pokemon nie trafi, wykonanie ruchu będzie niemożliwe (Paraliż, Dezorientacja, Zamrożenie) lub zaatakuje Pokemona używającego Fly, Dig bądź odpornego na typ. |
| Endure |
|
|
- | 100 | Przez 2 rundy nie można powalić Pokemona bezpośrednim atakiem (efekt znika po zablokowaniu pierwszego ruchu). Szansa na zadziałanie efektu ruchu jest zmniejszana o -5% za każde skuteczne przetrwanie ataku. Inne ruchy ohronne (Protect, Detect, Endure, Quick Guard, Spiky Shield, King's Shield, Baneful Bunker) dzielą tą samą szansę zadziałania efektu. Dodatkowo jeśli Pokemon posiada więcej niż jeden ruch ochronny, minimalna szansa na zadziałanie (równa 50%) jest dzielona przez 2 za każdy ruch ochronny ponad pierwszy.. |
| Swagger |
|
|
- | 85 | Po udanym użyciu zwiększa Atak przeciwnika o 2 poziomy (10%) ale także go Dezorientuje. |
| Sleep Talk |
|
|
- | 100 | Jeśli Pokemon śpi podczas użycia tego ruchu (został uśpiony w tej samej rundzie przed użyciem tego ruchu lub ruch jest następny w kolejce), zostanie wybrany jeden z pozostałych ruchów i użyty podczas snu. Wykonanie ruchu nie przedłuża trwania snu. Nie wszystkie ruchy mogą być wybrane do użycia (odpadają ruchy wielorundowe i inne zmieniające ruch). |
| Iron Tail |
|
|
100 | 75 | Po trafieniu 30% szansy na zmniejszenie Obrony przeciwnika. |
| Twister |
|
|
40 | 100 | Trafia z podwójną mocą Pokemony w trakcie Fly, Bounce i Sky Drop. Po trafieniu 20% szansy na oszołomienie przeciwnika. |
| Shock Wave |
|
|
60 | 1000 | Zawsze trafia. |
| Water Pulse |
|
|
60 | 100 | Po trafieniu 20% szansy na Zdezorientowanie przeciwnika. |
| Aqua Tail |
|
|
90 | 90 | Zadaje obrażenia. |
| Dragon Pulse |
|
|
85 | 100 | Zadaje obrażenia. |
| Draco Meteor |
|
|
130 | 90 | Po trafieniu obniża Specjalny Atak używającego o dwa poziomy (10%). |
Ewolucje

|
> 30 lvl |

|
> 55 lvl |

|
| Dratini | Dragonair | Dragonite |
| Powrót do Listy Pokemonów |