Snover: Różnice pomiędzy wersjami
Przejdź do nawigacji
Przejdź do wyszukiwania
(→Ewolucje: Poprawienie numeru w grafice Mega Abomasnowa) |
|||
| (Nie pokazano 3 wersji utworzonych przez 3 użytkowników) | |||
| Linia 1: | Linia 1: | ||
| − | |||
| − | |||
__NOTOC__ | __NOTOC__ | ||
{{TabelaNaprzemienneKolory| | {{TabelaNaprzemienneKolory| | ||
| Linia 82: | Linia 80: | ||
! width='3%' data-sort-type="number" | '''Celność''' | ! width='3%' data-sort-type="number" | '''Celność''' | ||
! width='38%' class="unsortable" | '''Efekt''' | ! width='38%' class="unsortable" | '''Efekt''' | ||
| + | |- | ||
| + | | '''[[Leer]]''' | ||
| + | | data-sort-value="1" | <img src='https://pokelife.pl/images/typy/1.png' height='25px' style='margin: 0;'/> | ||
| + | | data-sort-value="3" | <img src='https://pokelife.pl/images/typy/3.jpg' height='25px' style='margin: 0;'/> | ||
| + | | 1 | ||
| + | | - | ||
| + | | 100 | ||
| + | | Zmniejsza Obronę przeciwnika o 1 poziom (5%). | ||
|- | |- | ||
| '''[[Powder Snow]]''' | | '''[[Powder Snow]]''' | ||
| − | | data-sort-value="14" | <img src=' | + | | data-sort-value="14" | <img src='https://pokelife.pl/images/typy/14.png' height='25px' style='margin: 0;'/> |
| − | | data-sort-value="2" | <img src=' | + | | data-sort-value="2" | <img src='https://pokelife.pl/images/typy/2.jpg' height='25px' style='margin: 0;'/> |
| 1 | | 1 | ||
| 40 | | 40 | ||
| 100 | | 100 | ||
| − | | | + | | Po trafieniu 10% szansy na zamrożenie przeciwnika. |
| + | |- | ||
| + | | '''[[Leafage]]''' | ||
| + | | data-sort-value="4" | <img src='https://pokelife.pl/images/typy/4.png' height='25px' style='margin: 0;'/> | ||
| + | | data-sort-value="1" | <img src='https://pokelife.pl/images/typy/1.jpg' height='25px' style='margin: 0;'/> | ||
| + | | 5 | ||
| + | | 40 | ||
| + | | 100 | ||
| + | | Zadaje obrażenia. | ||
| + | |- | ||
| + | | '''[[Mist]]''' | ||
| + | | data-sort-value="14" | <img src='https://pokelife.pl/images/typy/14.png' height='25px' style='margin: 0;'/> | ||
| + | | data-sort-value="3" | <img src='https://pokelife.pl/images/typy/3.jpg' height='25px' style='margin: 0;'/> | ||
| + | | 10 | ||
| + | | - | ||
| + | | 100 | ||
| + | | Osłania przed zmianami statystyk na 3 rundy. | ||
|- | |- | ||
| − | | '''[[ | + | | '''[[Grass Whistle]]''' |
| − | | data-sort-value=" | + | | data-sort-value="4" | <img src='https://pokelife.pl/images/typy/4.png' height='25px' style='margin: 0;'/> |
| − | | data-sort-value="3" | <img src=' | + | | data-sort-value="3" | <img src='https://pokelife.pl/images/typy/3.jpg' height='25px' style='margin: 0;'/> |
| − | | | + | | 13 |
| - | | - | ||
| + | | 50 | ||
| + | | Po trafieniu usypia przeciwnika. | ||
| + | |- | ||
| + | | '''[[Ice Shard]]''' | ||
| + | | data-sort-value="14" | <img src='https://pokelife.pl/images/typy/14.png' height='25px' style='margin: 0;'/> | ||
| + | | data-sort-value="1" | <img src='https://pokelife.pl/images/typy/1.jpg' height='25px' style='margin: 0;'/> | ||
| + | | 15 | ||
| + | | 40 | ||
| 100 | | 100 | ||
| − | | | + | | Atak o priorytecie 1. |
|- | |- | ||
| '''[[Razor Leaf]]''' | | '''[[Razor Leaf]]''' | ||
| − | | data-sort-value="4" | <img src=' | + | | data-sort-value="4" | <img src='https://pokelife.pl/images/typy/4.png' height='25px' style='margin: 0;'/> |
| − | | data-sort-value="1" | <img src=' | + | | data-sort-value="1" | <img src='https://pokelife.pl/images/typy/1.jpg' height='25px' style='margin: 0;'/> |
| − | | | + | | 20 |
| 55 | | 55 | ||
| 95 | | 95 | ||
| − | | | + | | Ma zwiększoną szansę na cios krytyczny o 1 poziom. |
|- | |- | ||
| '''[[Icy Wind]]''' | | '''[[Icy Wind]]''' | ||
| − | | data-sort-value="14" | <img src=' | + | | data-sort-value="14" | <img src='https://pokelife.pl/images/typy/14.png' height='25px' style='margin: 0;'/> |
| − | | data-sort-value="2" | <img src=' | + | | data-sort-value="2" | <img src='https://pokelife.pl/images/typy/2.jpg' height='25px' style='margin: 0;'/> |
| − | | | + | | 25 |
| 55 | | 55 | ||
| 95 | | 95 | ||
| − | | | + | | Po trafieniu zmniejsza Szybkość przeciwnika o 1 poziom (5%). |
| − | |||
| − | |||
| − | |||
| − | |||
| − | |||
| − | |||
| − | |||
| − | |||
|- | |- | ||
| '''[[Swagger]]''' | | '''[[Swagger]]''' | ||
| − | | data-sort-value="1" | <img src=' | + | | data-sort-value="1" | <img src='https://pokelife.pl/images/typy/1.png' height='25px' style='margin: 0;'/> |
| − | | data-sort-value="3" | <img src=' | + | | data-sort-value="3" | <img src='https://pokelife.pl/images/typy/3.jpg' height='25px' style='margin: 0;'/> |
| − | | | + | | 30 |
| - | | - | ||
| − | | | + | | 85 |
| − | | | + | | Po udanym użyciu zwiększa Atak przeciwnika o 2 poziomy (10%) ale także go Dezorientuje. |
| − | |||
| − | |||
| − | |||
| − | |||
| − | |||
| − | |||
| − | |||
| − | |||
| − | |||
| − | |||
| − | |||
| − | |||
| − | |||
| − | |||
| − | |||
| − | |||
|- | |- | ||
| '''[[Ingrain]]''' | | '''[[Ingrain]]''' | ||
| − | | data-sort-value="4" | <img src=' | + | | data-sort-value="4" | <img src='https://pokelife.pl/images/typy/4.png' height='25px' style='margin: 0;'/> |
| − | | data-sort-value="3" | <img src=' | + | | data-sort-value="3" | <img src='https://pokelife.pl/images/typy/3.jpg' height='25px' style='margin: 0;'/> |
| − | | | + | | 35 |
| - | | - | ||
| 100 | | 100 | ||
| − | | | + | | Leczy po 7% aktualnego zdrowia Pokemona (zaczynając od rundy po użyciu ataku). Nie może wyleczyć poza ilość z jaką Pokemon wszedł do walki. |
|- | |- | ||
| '''[[Wood Hammer]]''' | | '''[[Wood Hammer]]''' | ||
| − | | data-sort-value="4" | <img src=' | + | | data-sort-value="4" | <img src='https://pokelife.pl/images/typy/4.png' height='25px' style='margin: 0;'/> |
| − | | data-sort-value="1" | <img src=' | + | | data-sort-value="1" | <img src='https://pokelife.pl/images/typy/1.jpg' height='25px' style='margin: 0;'/> |
| − | | | + | | 41 |
| 120 | | 120 | ||
| 100 | | 100 | ||
| − | | | + | | Po trafieniu używający otrzymuje 33% obrażeń zwrotnych. |
|- | |- | ||
| '''[[Blizzard]]''' | | '''[[Blizzard]]''' | ||
| − | | data-sort-value="14" | <img src=' | + | | data-sort-value="14" | <img src='https://pokelife.pl/images/typy/14.png' height='25px' style='margin: 0;'/> |
| − | | data-sort-value="2" | <img src=' | + | | data-sort-value="2" | <img src='https://pokelife.pl/images/typy/2.jpg' height='25px' style='margin: 0;'/> |
| − | | | + | | 45 |
| 110 | | 110 | ||
| 70 | | 70 | ||
| − | | | + | | Po trafieniu 10% szansy na zamrożenie przeciwnika. Podczas użycia Hail ignoruje celność i uniki przeciwnika, więc zawsze trafia. |
|- | |- | ||
| '''[[Sheer Cold]]''' | | '''[[Sheer Cold]]''' | ||
| − | | data-sort-value="14" | <img src=' | + | | data-sort-value="14" | <img src='https://pokelife.pl/images/typy/14.png' height='25px' style='margin: 0;'/> |
| − | | data-sort-value="2" | <img src=' | + | | data-sort-value="2" | <img src='https://pokelife.pl/images/typy/2.jpg' height='25px' style='margin: 0;'/> |
| − | | | + | | 50 |
| − | | | + | | 450 |
| − | | | + | | 25 |
| − | | | + | | Ruch KO. Gdy Pokemon atakuje przeciwnika na tym samym lub niższym poziomie moc wynosi 450, gdy przeciwnik ma wyższy poziom - atakuje z mocą 70. Nie może trafić krytycznie. Nie zadziała na Pokemony z typem Lodowym. |
| − | + | |} | |
| + | |||
| + | |||
== Dostępne TM == | == Dostępne TM == | ||
| Linia 187: | Linia 195: | ||
! width='3%' data-sort-type="number" | '''Typ''' | ! width='3%' data-sort-type="number" | '''Typ''' | ||
! width='3%' data-sort-type="number" | '''Kategoria''' | ! width='3%' data-sort-type="number" | '''Kategoria''' | ||
| − | ! width='6 | + | ! width='6%' data-sort-type="number" | '''Moc''' |
| − | |||
! width='3%' data-sort-type="number" | '''Celność''' | ! width='3%' data-sort-type="number" | '''Celność''' | ||
! width='38%' class="unsortable" | '''Efekt''' | ! width='38%' class="unsortable" | '''Efekt''' | ||
|- | |- | ||
| '''[[Mega Punch|TM 1 Mega Punch]]''' | | '''[[Mega Punch|TM 1 Mega Punch]]''' | ||
| − | | data-sort-value="1" | <img src=' | + | | data-sort-value="1" | <img src='https://pokelife.pl/images/typy/1.png' height='25px' style='margin: 0;'/> |
| − | | data-sort-value="1" | <img src=' | + | | data-sort-value="1" | <img src='https://pokelife.pl/images/typy/1.jpg' height='25px' style='margin: 0;'/> |
| − | |||
| 80 | | 80 | ||
| 85 | | 85 | ||
| − | | | + | | Zadaje obrażenia. |
|- | |- | ||
| '''[[Swords Dance|TM 3 Swords Dance]]''' | | '''[[Swords Dance|TM 3 Swords Dance]]''' | ||
| − | | data-sort-value="1" | <img src=' | + | | data-sort-value="1" | <img src='https://pokelife.pl/images/typy/1.png' height='25px' style='margin: 0;'/> |
| − | | data-sort-value="3" | <img src=' | + | | data-sort-value="3" | <img src='https://pokelife.pl/images/typy/3.jpg' height='25px' style='margin: 0;'/> |
| − | |||
| - | | - | ||
| 100 | | 100 | ||
| − | | | + | | Zwiększa Atak używającego o 2 poziomy (10%). |
| − | |||
| − | |||
| − | |||
| − | |||
| − | |||
| − | |||
| − | |||
| − | |||
|- | |- | ||
| '''[[Toxic|TM 6 Toxic]]''' | | '''[[Toxic|TM 6 Toxic]]''' | ||
| − | | data-sort-value="8" | <img src=' | + | | data-sort-value="8" | <img src='https://pokelife.pl/images/typy/8.png' height='25px' style='margin: 0;'/> |
| − | | data-sort-value="3" | <img src=' | + | | data-sort-value="3" | <img src='https://pokelife.pl/images/typy/3.jpg' height='25px' style='margin: 0;'/> |
| − | |||
| - | | - | ||
| 90 | | 90 | ||
| − | | | + | | Atak sam w sobie nie zadaje obrażeń, lecz ma dwa stopnie - zatrucia oraz zatrucia śmiertelnego, które zadaje podwójne obrażenia w stosunku do tego pierwszego. Zawsze trafia, gdy zostanie użyty przez trującego Pokemona. |
| − | |||
| − | |||
| − | |||
| − | |||
| − | |||
| − | |||
| − | |||
| − | |||
| − | |||
| − | |||
| − | |||
| − | |||
| − | |||
| − | |||
| − | |||
| − | |||
| − | |||
| − | |||
| − | |||
| − | |||
| − | |||
| − | |||
| − | |||
| − | |||
| − | |||
| − | |||
| − | |||
| − | |||
| − | |||
| − | |||
| − | |||
| − | |||
| − | |||
| − | |||
| − | |||
| − | |||
| − | |||
| − | |||
| − | |||
| − | |||
|- | |- | ||
| '''[[Ice Beam|TM 13 Ice Beam]]''' | | '''[[Ice Beam|TM 13 Ice Beam]]''' | ||
| − | | data-sort-value="14" | <img src=' | + | | data-sort-value="14" | <img src='https://pokelife.pl/images/typy/14.png' height='25px' style='margin: 0;'/> |
| − | | data-sort-value="2" | <img src=' | + | | data-sort-value="2" | <img src='https://pokelife.pl/images/typy/2.jpg' height='25px' style='margin: 0;'/> |
| − | |||
| 90 | | 90 | ||
| 100 | | 100 | ||
| − | | | + | | Po trafieniu 10% szansy na zamrożenie przeciwnika. |
|- | |- | ||
| '''[[Blizzard|TM 14 Blizzard]]''' | | '''[[Blizzard|TM 14 Blizzard]]''' | ||
| − | | data-sort-value="14" | <img src=' | + | | data-sort-value="14" | <img src='https://pokelife.pl/images/typy/14.png' height='25px' style='margin: 0;'/> |
| − | | data-sort-value="2" | <img src=' | + | | data-sort-value="2" | <img src='https://pokelife.pl/images/typy/2.jpg' height='25px' style='margin: 0;'/> |
| − | |||
| 110 | | 110 | ||
| 70 | | 70 | ||
| − | | | + | | Po trafieniu 10% szansy na zamrożenie przeciwnika. Podczas użycia Hail ignoruje celność i uniki przeciwnika, więc zawsze trafia. |
| − | |||
| − | |||
| − | |||
| − | |||
| − | |||
| − | |||
| − | |||
| − | |||
| − | |||
| − | |||
| − | |||
| − | |||
| − | |||
| − | |||
| − | |||
| − | |||
| − | |||
| − | |||
| − | |||
| − | |||
| − | |||
| − | |||
| − | |||
| − | |||
| − | |||
| − | |||
| − | |||
| − | |||
| − | |||
| − | |||
| − | |||
| − | |||
| − | |||
| − | |||
| − | |||
| − | |||
| − | |||
| − | |||
| − | |||
| − | |||
|- | |- | ||
| '''[[Solar Beam|TM 22 Solar Beam]]''' | | '''[[Solar Beam|TM 22 Solar Beam]]''' | ||
| − | | data-sort-value="4" | <img src=' | + | | data-sort-value="4" | <img src='https://pokelife.pl/images/typy/4.png' height='25px' style='margin: 0;'/> |
| − | | data-sort-value="2" | <img src=' | + | | data-sort-value="2" | <img src='https://pokelife.pl/images/typy/2.jpg' height='25px' style='margin: 0;'/> |
| − | |||
| 120 | | 120 | ||
| 100 | | 100 | ||
| − | | | + | | W pierwszej rundzie ładuje energię a w drugiej posyła właściwe obrażenia. W trakcie Ostrego Słońca atak nie wymaga ładowania w drugiej rundzie. W trakcie Deszczu, Burzy Piaskowej, Gradu i Mgły moc spada do 60. |
| − | |||
| − | |||
| − | |||
| − | |||
| − | |||
| − | |||
| − | |||
| − | |||
|- | |- | ||
| '''[[Double Team|TM 32 Double Team]]''' | | '''[[Double Team|TM 32 Double Team]]''' | ||
| − | | data-sort-value="1" | <img src=' | + | | data-sort-value="1" | <img src='https://pokelife.pl/images/typy/1.png' height='25px' style='margin: 0;'/> |
| − | | data-sort-value="3" | <img src=' | + | | data-sort-value="3" | <img src='https://pokelife.pl/images/typy/3.jpg' height='25px' style='margin: 0;'/> |
| − | |||
| - | | - | ||
| 100 | | 100 | ||
| − | | | + | | Zwiększa Unik używającego o 1 poziom (5%). |
| − | |||
| − | |||
| − | |||
| − | |||
| − | |||
| − | |||
| − | |||
| − | |||
|- | |- | ||
| '''[[Rest|TM 44 Rest]]''' | | '''[[Rest|TM 44 Rest]]''' | ||
| − | | data-sort-value="7" | <img src=' | + | | data-sort-value="7" | <img src='https://pokelife.pl/images/typy/7.png' height='25px' style='margin: 0;'/> |
| − | | data-sort-value="3" | <img src=' | + | | data-sort-value="3" | <img src='https://pokelife.pl/images/typy/3.jpg' height='25px' style='margin: 0;'/> |
| − | |||
| - | | - | ||
| 100 | | 100 | ||
| − | | | + | | W pierwszej rundzie leczy 25% aktualnego zdrowia pokemona oraz, jeśli pokemon dalej śpi pod koniec kolejnej rundy, leczy o kolejne 20% zdrowia z rundy, w której Rest został użyty. Dodatkowo ma 100% szans na usunięcie statusów (poparzenie, trucizna, paraliż). Po użyciu Rest, Pokemon śpi rundę, po czym w drugiej budzi się i używa następnego ataku. |
|- | |- | ||
| − | | '''[[ | + | | '''[[Snore|TM 59 Snore]]''' |
| − | | data-sort-value=" | + | | data-sort-value="1" | <img src='https://pokelife.pl/images/typy/1.png' height='25px' style='margin: 0;'/> |
| − | | data-sort-value=" | + | | data-sort-value="2" | <img src='https://pokelife.pl/images/typy/2.jpg' height='25px' style='margin: 0;'/> |
| − | |||
| − | |||
| 50 | | 50 | ||
| − | |||
| − | |||
| − | |||
| − | |||
| − | |||
| − | |||
| − | |||
| − | |||
| − | |||
| − | |||
| − | |||
| − | |||
| − | |||
| − | |||
| − | |||
| 100 | | 100 | ||
| − | | | + | | Ruch dojdzie do skutku jedynie kiedy zostanie użyty podczas snu. Jeśli ruch jest następny w kolejności po rundzie, w której Pokemon zasnął, zostanie on wykonany. Wykonanie ruchu nie przedłuża czasu trwania snu. |
|- | |- | ||
| '''[[Icy Wind|TM 60 Icy Wind]]''' | | '''[[Icy Wind|TM 60 Icy Wind]]''' | ||
| − | | data-sort-value="14" | <img src=' | + | | data-sort-value="14" | <img src='https://pokelife.pl/images/typy/14.png' height='25px' style='margin: 0;'/> |
| − | | data-sort-value="2" | <img src=' | + | | data-sort-value="2" | <img src='https://pokelife.pl/images/typy/2.jpg' height='25px' style='margin: 0;'/> |
| − | |||
| 55 | | 55 | ||
| 95 | | 95 | ||
| − | | | + | | Po trafieniu zmniejsza Szybkość przeciwnika o 1 poziom (5%). |
|- | |- | ||
| '''[[Protect|TM 61 Protect]]''' | | '''[[Protect|TM 61 Protect]]''' | ||
| − | | data-sort-value="1" | <img src=' | + | | data-sort-value="1" | <img src='https://pokelife.pl/images/typy/1.png' height='25px' style='margin: 0;'/> |
| − | | data-sort-value="3" | <img src=' | + | | data-sort-value="3" | <img src='https://pokelife.pl/images/typy/3.jpg' height='25px' style='margin: 0;'/> |
| − | |||
| - | | - | ||
| 100 | | 100 | ||
| − | | | + | | Po użyciu zablokuje następny, niestatusowy ruch przeciwnika. Atak o priorytecie 4. Szansa na zadziałanie efektu ruchu jest zmniejszana o -5% za każde skuteczne zablokowanie ruchu. Inne ruchy ohronne (Protect, Detect, Endure, Quick Guard, Spiky Shield, King's Shield, Baneful Bunker) dzielą tą samą szansę zadziałania efektu. Dodatkowo jeśli Pokemon posiada więcej niż jeden ruch ochronny, minimalna szansa na zadziałanie (równa 50%) jest dzielona przez 2 za każdy ruch ochronny ponad pierwszy. |
|- | |- | ||
| '''[[Rain Dance|TM 62 Rain Dance]]''' | | '''[[Rain Dance|TM 62 Rain Dance]]''' | ||
| − | | data-sort-value="3" | <img src=' | + | | data-sort-value="3" | <img src='https://pokelife.pl/images/typy/3.png' height='25px' style='margin: 0;'/> |
| − | | data-sort-value="3" | <img src=' | + | | data-sort-value="3" | <img src='https://pokelife.pl/images/typy/3.jpg' height='25px' style='margin: 0;'/> |
| − | |||
| - | | - | ||
| 100 | | 100 | ||
| − | | | + | | Przywołuje pogodę - Deszcz. |
|- | |- | ||
| '''[[Giga Drain|TM 63 Giga Drain]]''' | | '''[[Giga Drain|TM 63 Giga Drain]]''' | ||
| − | | data-sort-value="4" | <img src=' | + | | data-sort-value="4" | <img src='https://pokelife.pl/images/typy/4.png' height='25px' style='margin: 0;'/> |
| − | | data-sort-value="2" | <img src=' | + | | data-sort-value="2" | <img src='https://pokelife.pl/images/typy/2.jpg' height='25px' style='margin: 0;'/> |
| − | |||
| 75 | | 75 | ||
| 100 | | 100 | ||
| − | | | + | | Po trafieniu leczy 40% z zadanych obrażeń. Nie może wyleczyć poza ilość z jaką Pokemon wszedł do walki. |
|- | |- | ||
| '''[[Endure|TM 64 Endure]]''' | | '''[[Endure|TM 64 Endure]]''' | ||
| − | | data-sort-value="1" | <img src=' | + | | data-sort-value="1" | <img src='https://pokelife.pl/images/typy/1.png' height='25px' style='margin: 0;'/> |
| − | | data-sort-value="3" | <img src=' | + | | data-sort-value="3" | <img src='https://pokelife.pl/images/typy/3.jpg' height='25px' style='margin: 0;'/> |
| − | |||
| - | | - | ||
| 100 | | 100 | ||
| − | | | + | | Przez 2 rundy nie można powalić Pokemona bezpośrednim atakiem (efekt znika po zablokowaniu pierwszego ruchu). Szansa na zadziałanie efektu ruchu jest zmniejszana o -5% za każde skuteczne przetrwanie ataku. Inne ruchy ohronne (Protect, Detect, Endure, Quick Guard, Spiky Shield, King's Shield, Baneful Bunker) dzielą tą samą szansę zadziałania efektu. Dodatkowo jeśli Pokemon posiada więcej niż jeden ruch ochronny, minimalna szansa na zadziałanie (równa 50%) jest dzielona przez 2 za każdy ruch ochronny ponad pierwszy.. |
|- | |- | ||
| '''[[Frustration|TM 65 Frustration]]''' | | '''[[Frustration|TM 65 Frustration]]''' | ||
| − | | data-sort-value="1" | <img src=' | + | | data-sort-value="1" | <img src='https://pokelife.pl/images/typy/1.png' height='25px' style='margin: 0;'/> |
| − | | data-sort-value="1" | <img src=' | + | | data-sort-value="1" | <img src='https://pokelife.pl/images/typy/1.jpg' height='25px' style='margin: 0;'/> |
| − | |||
| 60 | | 60 | ||
| 100 | | 100 | ||
| − | | | + | | Moc zależna od przywiązania używającego. Moc 1 na 100% przywiązania oraz 102 na 0% (minusowe również 102). |
|- | |- | ||
| '''[[Iron Tail|TM 66 Iron Tail]]''' | | '''[[Iron Tail|TM 66 Iron Tail]]''' | ||
| − | | data-sort-value="11" | <img src=' | + | | data-sort-value="11" | <img src='https://pokelife.pl/images/typy/11.png' height='25px' style='margin: 0;'/> |
| − | | data-sort-value="1" | <img src=' | + | | data-sort-value="1" | <img src='https://pokelife.pl/images/typy/1.jpg' height='25px' style='margin: 0;'/> |
| − | |||
| 100 | | 100 | ||
| 75 | | 75 | ||
| − | | | + | | Po trafieniu 30% szansy na zmniejszenie Obrony przeciwnika. |
|- | |- | ||
| '''[[Return|TM 68 Return]]''' | | '''[[Return|TM 68 Return]]''' | ||
| − | | data-sort-value="1" | <img src=' | + | | data-sort-value="1" | <img src='https://pokelife.pl/images/typy/1.png' height='25px' style='margin: 0;'/> |
| − | | data-sort-value="1" | <img src=' | + | | data-sort-value="1" | <img src='https://pokelife.pl/images/typy/1.jpg' height='25px' style='margin: 0;'/> |
| − | |||
| 60 | | 60 | ||
| 100 | | 100 | ||
| − | | | + | | Moc wynosi 2 plus procent przywiązania Pokemona (maksymalnie 102). |
|- | |- | ||
| '''[[Shadow Ball|TM 69 Shadow Ball]]''' | | '''[[Shadow Ball|TM 69 Shadow Ball]]''' | ||
| − | | data-sort-value="9" | <img src=' | + | | data-sort-value="9" | <img src='https://pokelife.pl/images/typy/9.png' height='25px' style='margin: 0;'/> |
| − | | data-sort-value="2" | <img src=' | + | | data-sort-value="2" | <img src='https://pokelife.pl/images/typy/2.jpg' height='25px' style='margin: 0;'/> |
| − | |||
| 80 | | 80 | ||
| 100 | | 100 | ||
| − | | | + | | Po trafieniu 20% szansy na obniżenie Specjalnej Obrony przeciwnika o 1 poziom (5%). |
| − | |||
| − | |||
| − | |||
| − | |||
| − | |||
| − | |||
| − | |||
| − | |||
|- | |- | ||
| '''[[Ice Punch|TM 71 Ice Punch]]''' | | '''[[Ice Punch|TM 71 Ice Punch]]''' | ||
| − | | data-sort-value="14" | <img src=' | + | | data-sort-value="14" | <img src='https://pokelife.pl/images/typy/14.png' height='25px' style='margin: 0;'/> |
| − | | data-sort-value="1" | <img src=' | + | | data-sort-value="1" | <img src='https://pokelife.pl/images/typy/1.jpg' height='25px' style='margin: 0;'/> |
| − | |||
| 75 | | 75 | ||
| 100 | | 100 | ||
| − | | | + | | Po trafieniu 10% szansy na zamrożenie przeciwnika. |
| − | |||
| − | |||
| − | |||
| − | |||
| − | |||
| − | |||
| − | |||
| − | |||
|- | |- | ||
| '''[[Attract|TM 76 Attract]]''' | | '''[[Attract|TM 76 Attract]]''' | ||
| − | | data-sort-value="1" | <img src=' | + | | data-sort-value="1" | <img src='https://pokelife.pl/images/typy/1.png' height='25px' style='margin: 0;'/> |
| − | | data-sort-value="3" | <img src=' | + | | data-sort-value="3" | <img src='https://pokelife.pl/images/typy/3.jpg' height='25px' style='margin: 0;'/> |
| − | |||
| - | | - | ||
| 100 | | 100 | ||
| − | | | + | | Po trafieniu wprowadza przeciwnika w stan zakochania. Zakochanie trwa 2 rundy, podczas których Pokemon ma 50% na zaatakowanie. Działa tylko jeśli pokemony są przeciwnych płci. |
|- | |- | ||
| '''[[Swagger|TM 82 Swagger]]''' | | '''[[Swagger|TM 82 Swagger]]''' | ||
| − | | data-sort-value="1" | <img src=' | + | | data-sort-value="1" | <img src='https://pokelife.pl/images/typy/1.png' height='25px' style='margin: 0;'/> |
| − | | data-sort-value="3" | <img src=' | + | | data-sort-value="3" | <img src='https://pokelife.pl/images/typy/3.jpg' height='25px' style='margin: 0;'/> |
| − | |||
| - | | - | ||
| − | | | + | | 85 |
| − | | | + | | Po udanym użyciu zwiększa Atak przeciwnika o 2 poziomy (10%) ale także go Dezorientuje. |
|- | |- | ||
| − | | '''[[ | + | | '''[[Sleep Talk|TM 83 Sleep Talk]]''' |
| − | | data-sort-value=" | + | | data-sort-value="1" | <img src='https://pokelife.pl/images/typy/1.png' height='25px' style='margin: 0;'/> |
| − | | data-sort-value="3" | <img src=' | + | | data-sort-value="3" | <img src='https://pokelife.pl/images/typy/3.jpg' height='25px' style='margin: 0;'/> |
| − | |||
| - | | - | ||
| 100 | | 100 | ||
| − | | | + | | Jeśli Pokemon śpi podczas użycia tego ruchu (został uśpiony w tej samej rundzie przed użyciem tego ruchu lub ruch jest następny w kolejce), zostanie wybrany jeden z pozostałych ruchów i użyty podczas snu. Wykonanie ruchu nie przedłuża trwania snu. Nie wszystkie ruchy mogą być wybrane do użycia (odpadają ruchy wielorundowe i inne zmieniające ruch). |
|- | |- | ||
| '''[[Water Pulse|TM 95 Water Pulse]]''' | | '''[[Water Pulse|TM 95 Water Pulse]]''' | ||
| − | | data-sort-value="3" | <img src=' | + | | data-sort-value="3" | <img src='https://pokelife.pl/images/typy/3.png' height='25px' style='margin: 0;'/> |
| − | | data-sort-value="2" | <img src=' | + | | data-sort-value="2" | <img src='https://pokelife.pl/images/typy/2.jpg' height='25px' style='margin: 0;'/> |
| − | |||
| 60 | | 60 | ||
| 100 | | 100 | ||
| − | | | + | | Po trafieniu 20% szansy na Zdezorientowanie przeciwnika. |
|- | |- | ||
| '''[[Bullet Seed|TM 98 Bullet Seed]]''' | | '''[[Bullet Seed|TM 98 Bullet Seed]]''' | ||
| − | | data-sort-value="4" | <img src=' | + | | data-sort-value="4" | <img src='https://pokelife.pl/images/typy/4.png' height='25px' style='margin: 0;'/> |
| − | | data-sort-value="1" | <img src=' | + | | data-sort-value="1" | <img src='https://pokelife.pl/images/typy/1.jpg' height='25px' style='margin: 0;'/> |
| − | |||
| 25 | | 25 | ||
| 100 | | 100 | ||
| − | | | + | | Pokemon atakuje 2-5 razy. Każdy atak ma osobną szansę na trafienie. |
|- | |- | ||
| '''[[Hail|TM 100 Hail]]''' | | '''[[Hail|TM 100 Hail]]''' | ||
| − | | data-sort-value="14" | <img src=' | + | | data-sort-value="14" | <img src='https://pokelife.pl/images/typy/14.png' height='25px' style='margin: 0;'/> |
| − | | data-sort-value="3" | <img src=' | + | | data-sort-value="3" | <img src='https://pokelife.pl/images/typy/3.jpg' height='25px' style='margin: 0;'/> |
| − | |||
| - | | - | ||
| 100 | | 100 | ||
| − | | | + | | Przywołuje pogodę - Grad. |
|- | |- | ||
| '''[[Light Screen|TM 101 Light Screen]]''' | | '''[[Light Screen|TM 101 Light Screen]]''' | ||
| − | | data-sort-value="7" | <img src=' | + | | data-sort-value="7" | <img src='https://pokelife.pl/images/typy/7.png' height='25px' style='margin: 0;'/> |
| − | | data-sort-value="3" | <img src=' | + | | data-sort-value="3" | <img src='https://pokelife.pl/images/typy/3.jpg' height='25px' style='margin: 0;'/> |
| − | |||
| - | | - | ||
| 100 | | 100 | ||
| − | | | + | | Obniża o 40% obrażenia od specjalnych ataków na 3 rundy (z wyjątkiem obrażeń niezależnych od mocy). |
|- | |- | ||
| '''[[Safeguard|TM 102 Safeguard]]''' | | '''[[Safeguard|TM 102 Safeguard]]''' | ||
| − | | data-sort-value="1" | <img src=' | + | | data-sort-value="1" | <img src='https://pokelife.pl/images/typy/1.png' height='25px' style='margin: 0;'/> |
| − | | data-sort-value="3" | <img src=' | + | | data-sort-value="3" | <img src='https://pokelife.pl/images/typy/3.jpg' height='25px' style='margin: 0;'/> |
| − | |||
| - | | - | ||
| 100 | | 100 | ||
| − | | | + | | Po użyciu chroni używającego przed atakami zmieniającymi stan: paraliż, dezorientacja itd. Działa 3 rundy. |
|- | |- | ||
| '''[[Facade|TM 108 Facade]]''' | | '''[[Facade|TM 108 Facade]]''' | ||
| − | | data-sort-value="1" | <img src=' | + | | data-sort-value="1" | <img src='https://pokelife.pl/images/typy/1.png' height='25px' style='margin: 0;'/> |
| − | | data-sort-value="1" | <img src=' | + | | data-sort-value="1" | <img src='https://pokelife.pl/images/typy/1.jpg' height='25px' style='margin: 0;'/> |
| − | |||
| 70 | | 70 | ||
| 100 | | 100 | ||
| − | | | + | | Podstawowa moc 70. Moc 140 kiedy użytkownik jest sparaliżowany, zatruty lub płonie. |
|- | |- | ||
| '''[[Secret Power|TM 109 Secret Power]]''' | | '''[[Secret Power|TM 109 Secret Power]]''' | ||
| − | | data-sort-value="1" | <img src=' | + | | data-sort-value="1" | <img src='https://pokelife.pl/images/typy/1.png' height='25px' style='margin: 0;'/> |
| − | | data-sort-value="1" | <img src=' | + | | data-sort-value="1" | <img src='https://pokelife.pl/images/typy/1.jpg' height='25px' style='margin: 0;'/> |
| − | |||
| 70 | | 70 | ||
| 100 | | 100 | ||
| − | | | + | | Po trafieniu 30% szansy na specjalny efekt. Efekt jest zależny od Dziczy w której odbywa się walka. Każda Dzicz ma przypisany jeden efekt z następujących: Podpalenie, Paraliż, Uśpienie, Zamrożenie, obniżenie Ataku przeciwnika o 1 poziom (5%), obniżenie Sp Ataku przeciwnika o 1 poziom (5%), obniżenie Szybkości przeciwnika o 1 poziom (5%), obniżenie Celności przeciwnika o 1 poziom (5%). Poza Dziczami wybranym efektem jest Paraliż. |
|- | |- | ||
| '''[[Energy Ball|TM 134 Energy Ball]]''' | | '''[[Energy Ball|TM 134 Energy Ball]]''' | ||
| − | | data-sort-value="4" | <img src=' | + | | data-sort-value="4" | <img src='https://pokelife.pl/images/typy/4.png' height='25px' style='margin: 0;'/> |
| − | | data-sort-value="2" | <img src=' | + | | data-sort-value="2" | <img src='https://pokelife.pl/images/typy/2.jpg' height='25px' style='margin: 0;'/> |
| − | |||
| 90 | | 90 | ||
| 100 | | 100 | ||
| − | | | + | | Po trafieniu 10% szansy na obniżenie specjalnej obrony przeciwnika o 1 poziom (5%). |
|- | |- | ||
| '''[[Avalanche|TM 148 Avalanche]]''' | | '''[[Avalanche|TM 148 Avalanche]]''' | ||
| − | | data-sort-value="14" | <img src=' | + | | data-sort-value="14" | <img src='https://pokelife.pl/images/typy/14.png' height='25px' style='margin: 0;'/> |
| − | | data-sort-value="1" | <img src=' | + | | data-sort-value="1" | <img src='https://pokelife.pl/images/typy/1.jpg' height='25px' style='margin: 0;'/> |
| − | |||
| 60 | | 60 | ||
| 100 | | 100 | ||
| − | | | + | | Atak o priorytecie -4. Jeśli otrzymaliśmy obrażenia w tej rundzie (tylko bezpośrednie, klątwa i obrażenia od stanów nie są uwzględniane) podwajamy moc ataku. |
|- | |- | ||
| '''[[Captivate|TM 151 Captivate]]''' | | '''[[Captivate|TM 151 Captivate]]''' | ||
| − | | data-sort-value="1" | <img src=' | + | | data-sort-value="1" | <img src='https://pokelife.pl/images/typy/1.png' height='25px' style='margin: 0;'/> |
| − | | data-sort-value="3" | <img src=' | + | | data-sort-value="3" | <img src='https://pokelife.pl/images/typy/3.jpg' height='25px' style='margin: 0;'/> |
| − | |||
| - | | - | ||
| 100 | | 100 | ||
| − | | | + | | Obniża atak specjalny przeciwka o dwa poziomy (10%). Działa tylko jeśli pokemony są przeciwnych płci. |
|- | |- | ||
| '''[[Natural Gift|TM 154 Natural Gift]]''' | | '''[[Natural Gift|TM 154 Natural Gift]]''' | ||
| − | | data-sort-value="1" | <img src=' | + | | data-sort-value="1" | <img src='https://pokelife.pl/images/typy/1.png' height='25px' style='margin: 0;'/> |
| − | | data-sort-value="1" | <img src=' | + | | data-sort-value="1" | <img src='https://pokelife.pl/images/typy/1.jpg' height='25px' style='margin: 0;'/> |
| − | |||
| 80 | | 80 | ||
| 100 | | 100 | ||
| − | | | + | | Zadaje obrażenia. |
| + | |- | ||
| + | | '''[[Grass Knot|TM 156 Grass Knot]]''' | ||
| + | | data-sort-value="4" | <img src='https://pokelife.pl/images/typy/4.png' height='25px' style='margin: 0;'/> | ||
| + | | data-sort-value="2" | <img src='https://pokelife.pl/images/typy/2.jpg' height='25px' style='margin: 0;'/> | ||
| + | | 20 | ||
| + | | 100 | ||
| + | | Zadaje obrażenia zależnie od wagi przeciwnika - im cięższy tym większe obrażenia. | ||
|- | |- | ||
| '''[[Seed Bomb|TM 163 Seed Bomb]]''' | | '''[[Seed Bomb|TM 163 Seed Bomb]]''' | ||
| − | | data-sort-value="4" | <img src=' | + | | data-sort-value="4" | <img src='https://pokelife.pl/images/typy/4.png' height='25px' style='margin: 0;'/> |
| − | | data-sort-value="1" | <img src=' | + | | data-sort-value="1" | <img src='https://pokelife.pl/images/typy/1.jpg' height='25px' style='margin: 0;'/> |
| − | |||
| 80 | | 80 | ||
| 100 | | 100 | ||
| − | | | + | | Zadaje obrażenia. |
|- | |- | ||
| '''[[Round|TM 179 Round]]''' | | '''[[Round|TM 179 Round]]''' | ||
| − | | data-sort-value="1" | <img src=' | + | | data-sort-value="1" | <img src='https://pokelife.pl/images/typy/1.png' height='25px' style='margin: 0;'/> |
| − | | data-sort-value="2" | <img src=' | + | | data-sort-value="2" | <img src='https://pokelife.pl/images/typy/2.jpg' height='25px' style='margin: 0;'/> |
| − | |||
| 60 | | 60 | ||
| 100 | | 100 | ||
| − | | | + | | Zadaje obrażenia. |
|- | |- | ||
| '''[[Frost Breath|TM 191 Frost Breath]]''' | | '''[[Frost Breath|TM 191 Frost Breath]]''' | ||
| − | | data-sort-value="14" | <img src=' | + | | data-sort-value="14" | <img src='https://pokelife.pl/images/typy/14.png' height='25px' style='margin: 0;'/> |
| − | | data-sort-value="2" | <img src=' | + | | data-sort-value="2" | <img src='https://pokelife.pl/images/typy/2.jpg' height='25px' style='margin: 0;'/> |
| − | |||
| 60 | | 60 | ||
| 90 | | 90 | ||
| − | | { | + | | Zadaje obrażenia. |
| − | | | + | |- |
| + | | '''[[Confide|TM 215 Confide]]''' | ||
| + | | data-sort-value="1" | <img src='https://pokelife.pl/images/typy/1.png' height='25px' style='margin: 0;'/> | ||
| + | | data-sort-value="3" | <img src='https://pokelife.pl/images/typy/3.jpg' height='25px' style='margin: 0;'/> | ||
| + | | - | ||
| + | | 1000 | ||
| + | | Obniża Specjalny atak przeciwnika o jeden poziom (5%). Działa pomimo użycia przez przeciwnika Protect czy Detect. | ||
| + | |- | ||
| + | | '''[[Hidden Power|TM 227 Hidden Power]]''' | ||
| + | | data-sort-value="0" | <img src='https://pokelife.pl/images/typy/0.png' height='25px' style='margin: 0;'/> | ||
| + | | data-sort-value="2" | <img src='https://pokelife.pl/images/typy/2.jpg' height='25px' style='margin: 0;'/> | ||
| + | | 60 | ||
| + | | 100 | ||
| + | | Typ ruchu losowany z ID Pokemona jako stały seed - oznacza to, że dany Pokemon będzie miał zawsze ten sam typ tego ataku. | ||
| + | |} | ||
| + | |||
| + | |||
| + | |||
| + | == Nauczyciel Ruchów == | ||
| + | |||
| + | {| class="sortable Tabela1" | ||
| + | |- | ||
| + | ! width='12%' class="unsortable" | '''Posunięcie''' | ||
| + | ! width='3%' data-sort-type="number" | '''Typ''' | ||
| + | ! width='3%' data-sort-type="number" | '''Kategoria''' | ||
| + | ! width='6%' data-sort-type="number" | '''Moc''' | ||
| + | ! width='3%' data-sort-type="number" | '''Celność''' | ||
| + | ! width='38%' class="unsortable" | '''Efekt''' | ||
| + | |- | ||
| + | | '''[[Ice Punch]]''' | ||
| + | | data-sort-value="14" | <img src='https://pokelife.pl/images/typy/14.png' height='25px' style='margin: 0;'/> | ||
| + | | data-sort-value="1" | <img src='https://pokelife.pl/images/typy/1.jpg' height='25px' style='margin: 0;'/> | ||
| + | | 75 | ||
| + | | 100 | ||
| + | | Po trafieniu 10% szansy na zamrożenie przeciwnika. | ||
| + | |- | ||
| + | | '''[[Headbutt]]''' | ||
| + | | data-sort-value="1" | <img src='https://pokelife.pl/images/typy/1.png' height='25px' style='margin: 0;'/> | ||
| + | | data-sort-value="1" | <img src='https://pokelife.pl/images/typy/1.jpg' height='25px' style='margin: 0;'/> | ||
| + | | 70 | ||
| + | | 100 | ||
| + | | Po trafieniu 30% szansy na Oszołomienie przeciwnika. | ||
| + | |- | ||
| + | | '''[[Snore]]''' | ||
| + | | data-sort-value="1" | <img src='https://pokelife.pl/images/typy/1.png' height='25px' style='margin: 0;'/> | ||
| + | | data-sort-value="2" | <img src='https://pokelife.pl/images/typy/2.jpg' height='25px' style='margin: 0;'/> | ||
| + | | 50 | ||
| + | | 100 | ||
| + | | Ruch dojdzie do skutku jedynie kiedy zostanie użyty podczas snu. Jeśli ruch jest następny w kolejności po rundzie, w której Pokemon zasnął, zostanie on wykonany. Wykonanie ruchu nie przedłuża czasu trwania snu. | ||
| + | |- | ||
| + | | '''[[Mud-Slap]]''' | ||
| + | | data-sort-value="12" | <img src='https://pokelife.pl/images/typy/12.png' height='25px' style='margin: 0;'/> | ||
| + | | data-sort-value="2" | <img src='https://pokelife.pl/images/typy/2.jpg' height='25px' style='margin: 0;'/> | ||
| + | | 20 | ||
| + | | 100 | ||
| + | | Po trafieniu zmniejsza Celność przeciwnika o jeden poziom (5%). | ||
| + | |- | ||
| + | | '''[[Icy Wind]]''' | ||
| + | | data-sort-value="14" | <img src='https://pokelife.pl/images/typy/14.png' height='25px' style='margin: 0;'/> | ||
| + | | data-sort-value="2" | <img src='https://pokelife.pl/images/typy/2.jpg' height='25px' style='margin: 0;'/> | ||
| + | | 55 | ||
| + | | 95 | ||
| + | | Po trafieniu zmniejsza Szybkość przeciwnika o 1 poziom (5%). | ||
| + | |- | ||
| + | | '''[[Giga Drain]]''' | ||
| + | | data-sort-value="4" | <img src='https://pokelife.pl/images/typy/4.png' height='25px' style='margin: 0;'/> | ||
| + | | data-sort-value="2" | <img src='https://pokelife.pl/images/typy/2.jpg' height='25px' style='margin: 0;'/> | ||
| + | | 75 | ||
| + | | 100 | ||
| + | | Po trafieniu leczy 40% z zadanych obrażeń. Nie może wyleczyć poza ilość z jaką Pokemon wszedł do walki. | ||
| + | |- | ||
| + | | '''[[Sleep Talk]]''' | ||
| + | | data-sort-value="1" | <img src='https://pokelife.pl/images/typy/1.png' height='25px' style='margin: 0;'/> | ||
| + | | data-sort-value="3" | <img src='https://pokelife.pl/images/typy/3.jpg' height='25px' style='margin: 0;'/> | ||
| + | | - | ||
| + | | 100 | ||
| + | | Jeśli Pokemon śpi podczas użycia tego ruchu (został uśpiony w tej samej rundzie przed użyciem tego ruchu lub ruch jest następny w kolejce), zostanie wybrany jeden z pozostałych ruchów i użyty podczas snu. Wykonanie ruchu nie przedłuża trwania snu. Nie wszystkie ruchy mogą być wybrane do użycia (odpadają ruchy wielorundowe i inne zmieniające ruch). | ||
| + | |- | ||
| + | | '''[[Iron Tail]]''' | ||
| + | | data-sort-value="11" | <img src='https://pokelife.pl/images/typy/11.png' height='25px' style='margin: 0;'/> | ||
| + | | data-sort-value="1" | <img src='https://pokelife.pl/images/typy/1.jpg' height='25px' style='margin: 0;'/> | ||
| + | | 100 | ||
| + | | 75 | ||
| + | | Po trafieniu 30% szansy na zmniejszenie Obrony przeciwnika. | ||
| + | |- | ||
| + | | '''[[Synthesis]]''' | ||
| + | | data-sort-value="4" | <img src='https://pokelife.pl/images/typy/4.png' height='25px' style='margin: 0;'/> | ||
| + | | data-sort-value="3" | <img src='https://pokelife.pl/images/typy/3.jpg' height='25px' style='margin: 0;'/> | ||
| + | | - | ||
| + | | 100 | ||
| + | | Leczy 30% aktualnego zdrowia Pokemona. W trakcie Ostrego Słońca leczy o 33%, a w trakcie Deszczu, Gradu i Burzy Piaskowej o 25%. Nie może wyleczyć poza ilość z jaką Pokemon wszedł do walki. | ||
| + | |- | ||
| + | | '''[[Water Pulse]]''' | ||
| + | | data-sort-value="3" | <img src='https://pokelife.pl/images/typy/3.png' height='25px' style='margin: 0;'/> | ||
| + | | data-sort-value="2" | <img src='https://pokelife.pl/images/typy/2.jpg' height='25px' style='margin: 0;'/> | ||
| + | | 60 | ||
| + | | 100 | ||
| + | | Po trafieniu 20% szansy na Zdezorientowanie przeciwnika. | ||
| + | |- | ||
| + | | '''[[Seed Bomb]]''' | ||
| + | | data-sort-value="4" | <img src='https://pokelife.pl/images/typy/4.png' height='25px' style='margin: 0;'/> | ||
| + | | data-sort-value="1" | <img src='https://pokelife.pl/images/typy/1.jpg' height='25px' style='margin: 0;'/> | ||
| + | | 80 | ||
| + | | 100 | ||
| + | | Zadaje obrażenia. | ||
| + | |} | ||
| + | |||
== Ewolucje == | == Ewolucje == | ||
Aktualna wersja na dzień 13:20, 28 gru 2022
| #458 Mantyke | #459 Snover (Lista Pokemonów) | #460 Abomasnow |
Snover
|
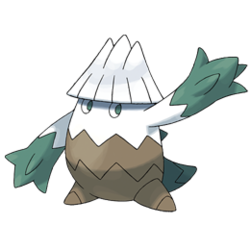 Zwykły |
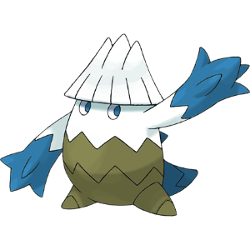 Shiny |
| ||||||||||||||||||||||||||||||||||||
| |||||||||||||||||||||||||||||||||||||||
| |||||||||||||||||||||||||||||||||||||||
 Trawiasty
  Lodowy


Wygląd i zachowanie
Snover to niewielkie stworzenie przypominające pokryte śniegiem drzewo. Jego ciało na górze jest białe, zaś na dole brązowe. Jeżeli mamy do czynienia z samcem, to dwie trzecie ciała jest brązowe, natomiast u samic dwie trzecie jest koloru białego. Kolce w kształcie szyszek na plecach, czteropalczaste ręce oraz oczy pokemona są w kolorze zielonym. Na szczycie śnieżnej czapki znajdują się trzy wybrzuszenia. Jego stopy są niewielkie i przysadziste.
Gdy pora jest ciepła, Snovera spotkać można na ośnieżonych szczytach. Jeśli pogoda się oziębi, Pokemon przemieszcza się niżej. Jest to śmiałe stworzenie, które często zbliża się do ludzi. Można go łatwo wytropić za pomocą śladów, które zostawia w śniegu.
Posunięcia
| Posunięcie | Typ | Kategoria | Min lvl | Moc | Celność | Efekt |
|---|---|---|---|---|---|---|
| Leer | 
|

|
1 | - | 100 | Zmniejsza Obronę przeciwnika o 1 poziom (5%). |
| Powder Snow | 
|

|
1 | 40 | 100 | Po trafieniu 10% szansy na zamrożenie przeciwnika. |
| Leafage | 
|

|
5 | 40 | 100 | Zadaje obrażenia. |
| Mist |
|
|
10 | - | 100 | Osłania przed zmianami statystyk na 3 rundy. |
| Grass Whistle |
|
|
13 | - | 50 | Po trafieniu usypia przeciwnika. |
| Ice Shard |
|
|
15 | 40 | 100 | Atak o priorytecie 1. |
| Razor Leaf |
|
|
20 | 55 | 95 | Ma zwiększoną szansę na cios krytyczny o 1 poziom. |
| Icy Wind |
|
|
25 | 55 | 95 | Po trafieniu zmniejsza Szybkość przeciwnika o 1 poziom (5%). |
| Swagger |
|
|
30 | - | 85 | Po udanym użyciu zwiększa Atak przeciwnika o 2 poziomy (10%) ale także go Dezorientuje. |
| Ingrain |
|
|
35 | - | 100 | Leczy po 7% aktualnego zdrowia Pokemona (zaczynając od rundy po użyciu ataku). Nie może wyleczyć poza ilość z jaką Pokemon wszedł do walki. |
| Wood Hammer |
|
|
41 | 120 | 100 | Po trafieniu używający otrzymuje 33% obrażeń zwrotnych. |
| Blizzard |
|
|
45 | 110 | 70 | Po trafieniu 10% szansy na zamrożenie przeciwnika. Podczas użycia Hail ignoruje celność i uniki przeciwnika, więc zawsze trafia. |
| Sheer Cold |
|
|
50 | 450 | 25 | Ruch KO. Gdy Pokemon atakuje przeciwnika na tym samym lub niższym poziomie moc wynosi 450, gdy przeciwnik ma wyższy poziom - atakuje z mocą 70. Nie może trafić krytycznie. Nie zadziała na Pokemony z typem Lodowym. |
Dostępne TM
| Posunięcie | Typ | Kategoria | Moc | Celność | Efekt |
|---|---|---|---|---|---|
| TM 1 Mega Punch |
|
|
80 | 85 | Zadaje obrażenia. |
| TM 3 Swords Dance |
|
|
- | 100 | Zwiększa Atak używającego o 2 poziomy (10%). |
| TM 6 Toxic | 
|
|
- | 90 | Atak sam w sobie nie zadaje obrażeń, lecz ma dwa stopnie - zatrucia oraz zatrucia śmiertelnego, które zadaje podwójne obrażenia w stosunku do tego pierwszego. Zawsze trafia, gdy zostanie użyty przez trującego Pokemona. |
| TM 13 Ice Beam |
|
|
90 | 100 | Po trafieniu 10% szansy na zamrożenie przeciwnika. |
| TM 14 Blizzard |
|
|
110 | 70 | Po trafieniu 10% szansy na zamrożenie przeciwnika. Podczas użycia Hail ignoruje celność i uniki przeciwnika, więc zawsze trafia. |
| TM 22 Solar Beam |
|
|
120 | 100 | W pierwszej rundzie ładuje energię a w drugiej posyła właściwe obrażenia. W trakcie Ostrego Słońca atak nie wymaga ładowania w drugiej rundzie. W trakcie Deszczu, Burzy Piaskowej, Gradu i Mgły moc spada do 60. |
| TM 32 Double Team |
|
|
- | 100 | Zwiększa Unik używającego o 1 poziom (5%). |
| TM 44 Rest | 
|
|
- | 100 | W pierwszej rundzie leczy 25% aktualnego zdrowia pokemona oraz, jeśli pokemon dalej śpi pod koniec kolejnej rundy, leczy o kolejne 20% zdrowia z rundy, w której Rest został użyty. Dodatkowo ma 100% szans na usunięcie statusów (poparzenie, trucizna, paraliż). Po użyciu Rest, Pokemon śpi rundę, po czym w drugiej budzi się i używa następnego ataku. |
| TM 59 Snore |
|
|
50 | 100 | Ruch dojdzie do skutku jedynie kiedy zostanie użyty podczas snu. Jeśli ruch jest następny w kolejności po rundzie, w której Pokemon zasnął, zostanie on wykonany. Wykonanie ruchu nie przedłuża czasu trwania snu. |
| TM 60 Icy Wind |
|
|
55 | 95 | Po trafieniu zmniejsza Szybkość przeciwnika o 1 poziom (5%). |
| TM 61 Protect |
|
|
- | 100 | Po użyciu zablokuje następny, niestatusowy ruch przeciwnika. Atak o priorytecie 4. Szansa na zadziałanie efektu ruchu jest zmniejszana o -5% za każde skuteczne zablokowanie ruchu. Inne ruchy ohronne (Protect, Detect, Endure, Quick Guard, Spiky Shield, King's Shield, Baneful Bunker) dzielą tą samą szansę zadziałania efektu. Dodatkowo jeśli Pokemon posiada więcej niż jeden ruch ochronny, minimalna szansa na zadziałanie (równa 50%) jest dzielona przez 2 za każdy ruch ochronny ponad pierwszy. |
| TM 62 Rain Dance | 
|
|
- | 100 | Przywołuje pogodę - Deszcz. |
| TM 63 Giga Drain |
|
|
75 | 100 | Po trafieniu leczy 40% z zadanych obrażeń. Nie może wyleczyć poza ilość z jaką Pokemon wszedł do walki. |
| TM 64 Endure |
|
|
- | 100 | Przez 2 rundy nie można powalić Pokemona bezpośrednim atakiem (efekt znika po zablokowaniu pierwszego ruchu). Szansa na zadziałanie efektu ruchu jest zmniejszana o -5% za każde skuteczne przetrwanie ataku. Inne ruchy ohronne (Protect, Detect, Endure, Quick Guard, Spiky Shield, King's Shield, Baneful Bunker) dzielą tą samą szansę zadziałania efektu. Dodatkowo jeśli Pokemon posiada więcej niż jeden ruch ochronny, minimalna szansa na zadziałanie (równa 50%) jest dzielona przez 2 za każdy ruch ochronny ponad pierwszy.. |
| TM 65 Frustration |
|
|
60 | 100 | Moc zależna od przywiązania używającego. Moc 1 na 100% przywiązania oraz 102 na 0% (minusowe również 102). |
| TM 66 Iron Tail | 
|
|
100 | 75 | Po trafieniu 30% szansy na zmniejszenie Obrony przeciwnika. |
| TM 68 Return |
|
|
60 | 100 | Moc wynosi 2 plus procent przywiązania Pokemona (maksymalnie 102). |
| TM 69 Shadow Ball | 
|
|
80 | 100 | Po trafieniu 20% szansy na obniżenie Specjalnej Obrony przeciwnika o 1 poziom (5%). |
| TM 71 Ice Punch |
|
|
75 | 100 | Po trafieniu 10% szansy na zamrożenie przeciwnika. |
| TM 76 Attract |
|
|
- | 100 | Po trafieniu wprowadza przeciwnika w stan zakochania. Zakochanie trwa 2 rundy, podczas których Pokemon ma 50% na zaatakowanie. Działa tylko jeśli pokemony są przeciwnych płci. |
| TM 82 Swagger |
|
|
- | 85 | Po udanym użyciu zwiększa Atak przeciwnika o 2 poziomy (10%) ale także go Dezorientuje. |
| TM 83 Sleep Talk |
|
|
- | 100 | Jeśli Pokemon śpi podczas użycia tego ruchu (został uśpiony w tej samej rundzie przed użyciem tego ruchu lub ruch jest następny w kolejce), zostanie wybrany jeden z pozostałych ruchów i użyty podczas snu. Wykonanie ruchu nie przedłuża trwania snu. Nie wszystkie ruchy mogą być wybrane do użycia (odpadają ruchy wielorundowe i inne zmieniające ruch). |
| TM 95 Water Pulse |
|
|
60 | 100 | Po trafieniu 20% szansy na Zdezorientowanie przeciwnika. |
| TM 98 Bullet Seed |
|
|
25 | 100 | Pokemon atakuje 2-5 razy. Każdy atak ma osobną szansę na trafienie. |
| TM 100 Hail |
|
|
- | 100 | Przywołuje pogodę - Grad. |
| TM 101 Light Screen |
|
|
- | 100 | Obniża o 40% obrażenia od specjalnych ataków na 3 rundy (z wyjątkiem obrażeń niezależnych od mocy). |
| TM 102 Safeguard |
|
|
- | 100 | Po użyciu chroni używającego przed atakami zmieniającymi stan: paraliż, dezorientacja itd. Działa 3 rundy. |
| TM 108 Facade |
|
|
70 | 100 | Podstawowa moc 70. Moc 140 kiedy użytkownik jest sparaliżowany, zatruty lub płonie. |
| TM 109 Secret Power |
|
|
70 | 100 | Po trafieniu 30% szansy na specjalny efekt. Efekt jest zależny od Dziczy w której odbywa się walka. Każda Dzicz ma przypisany jeden efekt z następujących: Podpalenie, Paraliż, Uśpienie, Zamrożenie, obniżenie Ataku przeciwnika o 1 poziom (5%), obniżenie Sp Ataku przeciwnika o 1 poziom (5%), obniżenie Szybkości przeciwnika o 1 poziom (5%), obniżenie Celności przeciwnika o 1 poziom (5%). Poza Dziczami wybranym efektem jest Paraliż. |
| TM 134 Energy Ball |
|
|
90 | 100 | Po trafieniu 10% szansy na obniżenie specjalnej obrony przeciwnika o 1 poziom (5%). |
| TM 148 Avalanche |
|
|
60 | 100 | Atak o priorytecie -4. Jeśli otrzymaliśmy obrażenia w tej rundzie (tylko bezpośrednie, klątwa i obrażenia od stanów nie są uwzględniane) podwajamy moc ataku. |
| TM 151 Captivate |
|
|
- | 100 | Obniża atak specjalny przeciwka o dwa poziomy (10%). Działa tylko jeśli pokemony są przeciwnych płci. |
| TM 154 Natural Gift |
|
|
80 | 100 | Zadaje obrażenia. |
| TM 156 Grass Knot |
|
|
20 | 100 | Zadaje obrażenia zależnie od wagi przeciwnika - im cięższy tym większe obrażenia. |
| TM 163 Seed Bomb |
|
|
80 | 100 | Zadaje obrażenia. |
| TM 179 Round |
|
|
60 | 100 | Zadaje obrażenia. |
| TM 191 Frost Breath |
|
|
60 | 90 | Zadaje obrażenia. |
| TM 215 Confide |
|
|
- | 1000 | Obniża Specjalny atak przeciwnika o jeden poziom (5%). Działa pomimo użycia przez przeciwnika Protect czy Detect. |
| TM 227 Hidden Power | 
|
|
60 | 100 | Typ ruchu losowany z ID Pokemona jako stały seed - oznacza to, że dany Pokemon będzie miał zawsze ten sam typ tego ataku. |
Nauczyciel Ruchów
| Posunięcie | Typ | Kategoria | Moc | Celność | Efekt |
|---|---|---|---|---|---|
| Ice Punch |
|
|
75 | 100 | Po trafieniu 10% szansy na zamrożenie przeciwnika. |
| Headbutt |
|
|
70 | 100 | Po trafieniu 30% szansy na Oszołomienie przeciwnika. |
| Snore |
|
|
50 | 100 | Ruch dojdzie do skutku jedynie kiedy zostanie użyty podczas snu. Jeśli ruch jest następny w kolejności po rundzie, w której Pokemon zasnął, zostanie on wykonany. Wykonanie ruchu nie przedłuża czasu trwania snu. |
| Mud-Slap | 
|
|
20 | 100 | Po trafieniu zmniejsza Celność przeciwnika o jeden poziom (5%). |
| Icy Wind |
|
|
55 | 95 | Po trafieniu zmniejsza Szybkość przeciwnika o 1 poziom (5%). |
| Giga Drain |
|
|
75 | 100 | Po trafieniu leczy 40% z zadanych obrażeń. Nie może wyleczyć poza ilość z jaką Pokemon wszedł do walki. |
| Sleep Talk |
|
|
- | 100 | Jeśli Pokemon śpi podczas użycia tego ruchu (został uśpiony w tej samej rundzie przed użyciem tego ruchu lub ruch jest następny w kolejce), zostanie wybrany jeden z pozostałych ruchów i użyty podczas snu. Wykonanie ruchu nie przedłuża trwania snu. Nie wszystkie ruchy mogą być wybrane do użycia (odpadają ruchy wielorundowe i inne zmieniające ruch). |
| Iron Tail |
|
|
100 | 75 | Po trafieniu 30% szansy na zmniejszenie Obrony przeciwnika. |
| Synthesis |
|
|
- | 100 | Leczy 30% aktualnego zdrowia Pokemona. W trakcie Ostrego Słońca leczy o 33%, a w trakcie Deszczu, Gradu i Burzy Piaskowej o 25%. Nie może wyleczyć poza ilość z jaką Pokemon wszedł do walki. |
| Water Pulse |
|
|
60 | 100 | Po trafieniu 20% szansy na Zdezorientowanie przeciwnika. |
| Seed Bomb |
|
|
80 | 100 | Zadaje obrażenia. |
Ewolucje

|
> 40 lvl |
|
> Abomasite |
|
| Snover | Abomasnow | Mega Abomasnow |
| Powrót do Listy Pokemonów |